Posted on

Have a crafty Easter with these 6 egg-citing craft activities

Easter craft header image


Break out the bunny onesie, because Easter’s coming! It’s time for hat parades, egg hunts, chocolate bunnies and colourful craft egg-tivities!  

Here are 6 egg-cellent, egg-straordinary and egg-stra special craft activities to help little crafters create gifts, ornaments, cards and other seasonal cuteness. They’re easy, and they produce beautiful Easter treasures! Let’s hop right into it…  


Wooden Weaving Bunny


Wooden Weaving Bunny


You will need:  

Wooden Weaving Bunny 

Pastel Paint 

Pastel Acrylic Yarn 

Plastic Lacing Needles  

Joggle Eyes 

Pastel Pony Beads 

Green Silk Clay 

White Silk Clay 

Mini Carrots 


Step-by-step: 

Assemble the Wooden Weaving Bunny by slotting the bunny into the stand.  

Apply your desired shades of pastel paint to the bunny and stand, and set aside to dry. Repeat paint application if desired.  

Cut a workable length of yarn roughly 40cm long and thread one end onto a plastic lacing needle. Tie the other end around a section of the bunny with a firm knot at the back. 

Thread the lacing needle with its yarn through the pre-cut holes of the bunny, weaving in and out all over as desired.  

When there’s only a short length of yarn left, remove the plastic threading needle and tie onto the bunny with a firm knot at the back.  

Repeat steps 3 to 5 with as many colours of thread as desired.  

When you’ve reached the last length of thread, begin by tying the end to the bunny and then slot a pastel bead onto the yarn, setting it in place at the front of the bunny while weaving. Continue adding pastel beads as desired and tie off the end of the yarn firmly at the back.  

Mix green and white silk clay together to form a pastel green and press down onto the stand to cover the surface.  

Use craft glue to adhere joggle eyes, a pom pom tail and a few carrots.  

Done! The perfect Weaving Bunny is ready.  


TOP TIP: Younger age groups can swap the beads for ready-to-use foam or felt shapes with a dab of glue. 


DIY Stencil Cards


You will need:  

Easter Stencils 

Pastel Coloured Cardboard 

Creatistics A4 White Cover Paper 

Pastel Paint 

Creatistics Glue Sticks 

Connector Colour Markers 

Stationery Scissors 

Bio-Glitter – Pack of 12 


Step-by-step: 

Pour a small amount of pastel paint onto a flat surface (painting trays, plates, etc). Use a brush or roller to even out the colour. 

Lay an Easter Stencil over a piece of white cover paper and secure in place with a bit of masking tape.  

Gently dab a sponge into the paint (avoiding large blobs).  

Gently dab the sponge over the stencil, making sure to sponge all the sections of paper through the stencil’s cut-out pattern.  

Carefully remove the masking tape and lift the stencil off the paper. Set the paper aside to dry.  

Fold a piece of pastel cardboard in half (two short lengths together) to make a card.  

When the paint has dried, cut out the stencilled shape and use a glue stick to attach to the card.  

Use coloured makers, Bio-Glitter and joggle eyes as desired to add detail to the cards and set aside to dry.  

Done! The perfect DIY Easter Stencil Card is ready.  


TOP TIP: For early childhood-aged children not yet confident with scissor skills, pop the stencil directly onto the pastel card to paint the pattern. 


Sponge Print Fridge Magnets


Sponge Print Fridge Magnets


You will need:  

Easter Sponges 

Pastel Cardboard

Wooden Pegs 

Self-Adhesive Magnetic Sheets 

Creatistics Strong Craft Glue 

Joggle Eyes 


Step-by-step: 

Pour a small amount of pastel paint onto a flat surface (painting trays, plates, messy mats, etc) and use a brush or roller to spread the colour to an even layer. 

Gently press an Easter Sponge into the paint, then lift out of the paint and gently press down onto the cardboard. Lift off once more, leaving the painted print on the cardboard. Repeat as desired with each shape to fill the paper. Set aside to dry.  

Use the leftover paint or POSCA markers to add detail over the dried paint (an orange beak, patterns on the eggs, etc) and set aside to dry.  

Feed the dried painting through a laminator and set aside to cool down.  

Carefully cut around the shapes.  

Use strong craft glue to attach a wooden peg to the back of the laminated shape and joggle eyes onto the chick & bunny and set aside to dry.  

Peel and stick a self-adhesive magnet to the back of the peg.  

Done! The perfect Easter magnet is ready.  


TOP TIP: Easter sponges are wonderfully versatile! Sponge the shapes onto cards, wrapping paper and Easter Hats. Or snip the prints out and paste them onto pop sticks for adorable storytelling props! 


Wooden Diorama Frame 


Wooden Diorama Bunny


You will need:  

Wooden Easter Diorama Frame  

Pastel Paint 

Pastel Acrylic Yarn 

Pastel Pom Poms 

Glitter Foam Flowers 

Sequin Flowers 

Adhesive Rhinestones 

Green Crinkle Paper Shred 

Joggle Eyes 

Mini Carrots 

Creatistics Strong Craft Glue 


Yarn Chick, Bunny & Egg Ornaments 


Yarn Chick and Bunny

You will need:  

Creatistics Pastel Paint 

Pastel Acrylic Yarn 

Wooden Easter Ornaments 

Joggle Eyes 

Creatistics Strong Craft Glue 

Matt Paper Squares 

Coloured Tissue Squares 

Pastel Pom Poms 

Natural Beading Cord 

Paper Magiclay  


Step-by-step: 

Cover the wooden ornament in a layer of pastel paint and set aside to dry. Repeat paint application as desired. 

For the Bunny and Chick, cut a workable length of yarn, wrap it around the wooden ornament, and tie it with a strong knot.  

Wrap the yarn around the ornament until it looks full of colour (if needed, add another length of yarn). Tie the yarn off securely at the back.  

For the Bunny – snip three lengths of beading cord 10cm in length, tie a knot in the middle to make whiskers, and press a small amount of pink Magiclay around the middle to hide the knot and make a nose. Attach in place with craft glue, along with two joggle eyes. Set aside to dry.  

For the Chick – scrunch two tissue squares from the centre to make the wings. Fold an orange paper square in half and roughly draw a foot. Snip the foot out (you should now have two) and snip a small triangle shape along the remaining paper’s fold to make a little beak. Attach the feet, wings, beak and two joggle eyes in place with craft glue. Set aside to dry.  

For the Egg – use the craft glue nozzle to ‘draw’ lines and squiggles on the surface, carefully placing short lengths of yarn over the glue. Finish off with a few pom poms and set aside to dry.  

For each decoration, snip a short length of beading cord, thread it through the pre-cut hole and tie it into a loop to hang. 

Done! The perfect Easter Yarn Ornament is ready.  


TOP TIP: Taping the yarn at the back of the ornament with masking tape periodically will provide support for children with emerging fine motor skills. 


Roller Print & Yarn Bonnet


Easter Bonnet


You will need:  

Easter Rollers 

Cardboard Easter Hat 

Creatistics Pastel Paint 

Pastel Pom Poms 

Pastel Acrylic Yarn 

Bio-Glitter – Pack of 12 

Tacky Glue 

Creatistics Strong Craft Glue 

Painting Tray 


Step-by-step: 

Pop-out each piece from the large sheet of card. 

Use brushes or sponges to apply a thin layer of pastel paint to the pieces and set aside to dry.  

Pour a contrasting-coloured paint onto a messy mat or painting tray and use a brush or roller to smooth the paint to an even layer. Only a little paint is needed to make smooth prints.  

Gently roll the Easter Rollers in the paint, ensuring an even layer of paint over each raised shape.  

Roll the paint-loaded Easter Roller over the cardboard pieces, leaving behind its colourful print. Repeat as desired and set aside to dry. 

Use the strong craft glue nozzle to ‘draw’ wavy lines over the crown and brim pieces, snip lengths of pastel yarn and gently press into place using the glue lines as a guide. Use the craft glue to ‘draw’ lines and shapes to shake Bio-Glitter onto, and small blobs of tacky glue to adhere the pom poms. Set aside to dry. 

To assemble, sticky tape the scalloped crown piece together by the tabs, making sure it will fit the brim.  

Sticky tape the tabs on the bottom of the crown piece to the underside of the brim. 

If desired, sticky tape the tabs on the top circle to the crown piece (making a shelf to hold extra decorations). Set aside to dry. 

Done! The perfect Easter Hat is ready.  


TOP TIP: There’s no need for precise designs! The free-form style of this Easter Hat craft is wonderfully open-ended. 


We hope you love getting crafty this Easter and creating these 6 fun activities. If you’d like to download the step-by-step activity pack pdf, click here. Happy crafting, and please share your crafty Easter creations with us @modernteaching. 


Blog Home>

Shop MTA>


Posted on

13 Mother’s Day handmade gift ideas

Mother's Day Intro Image

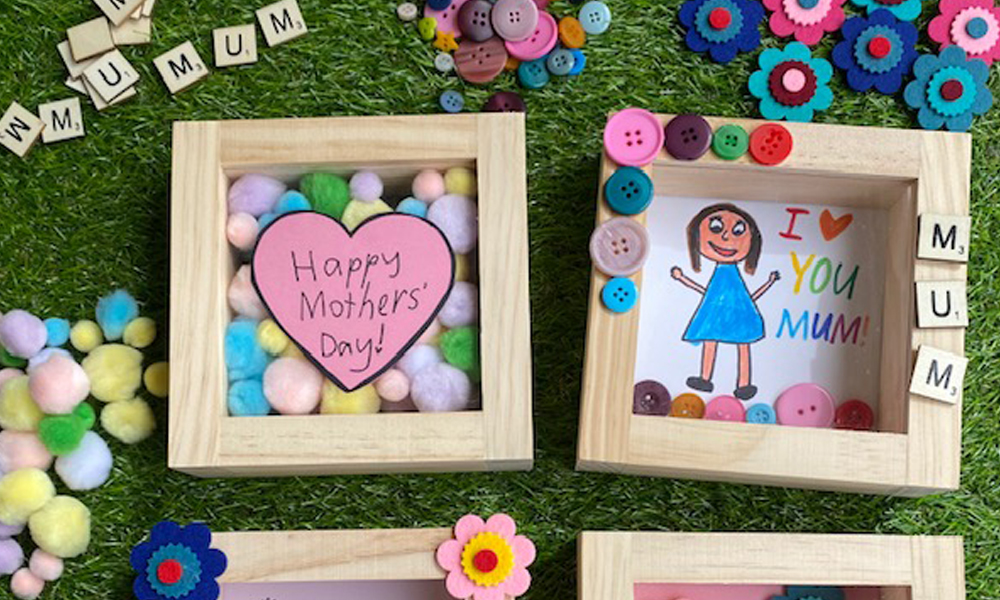
Mother’s Day is right round the corner!  We’ve gathered up our best inspirational list of thoughtful handmade gifts for the maternal figures in our lives – representing the love and gratitude we feel for them and to celebrate all they do for us each day.  

There are so many keepsakes to create! And the beauty of MTA’s open-ended range of Mother’s Day materials is the ability to adapt the activities to children’s ages, needs & suitability – ensuring they can make a personalised treasure that’s just right for their much-loved role models. 

Read on for some creative Mother’s Day themed crafts to make ‘Mum’ feel special.  


Ceramic Teacup Planter 

Ceramic Teacup Planter


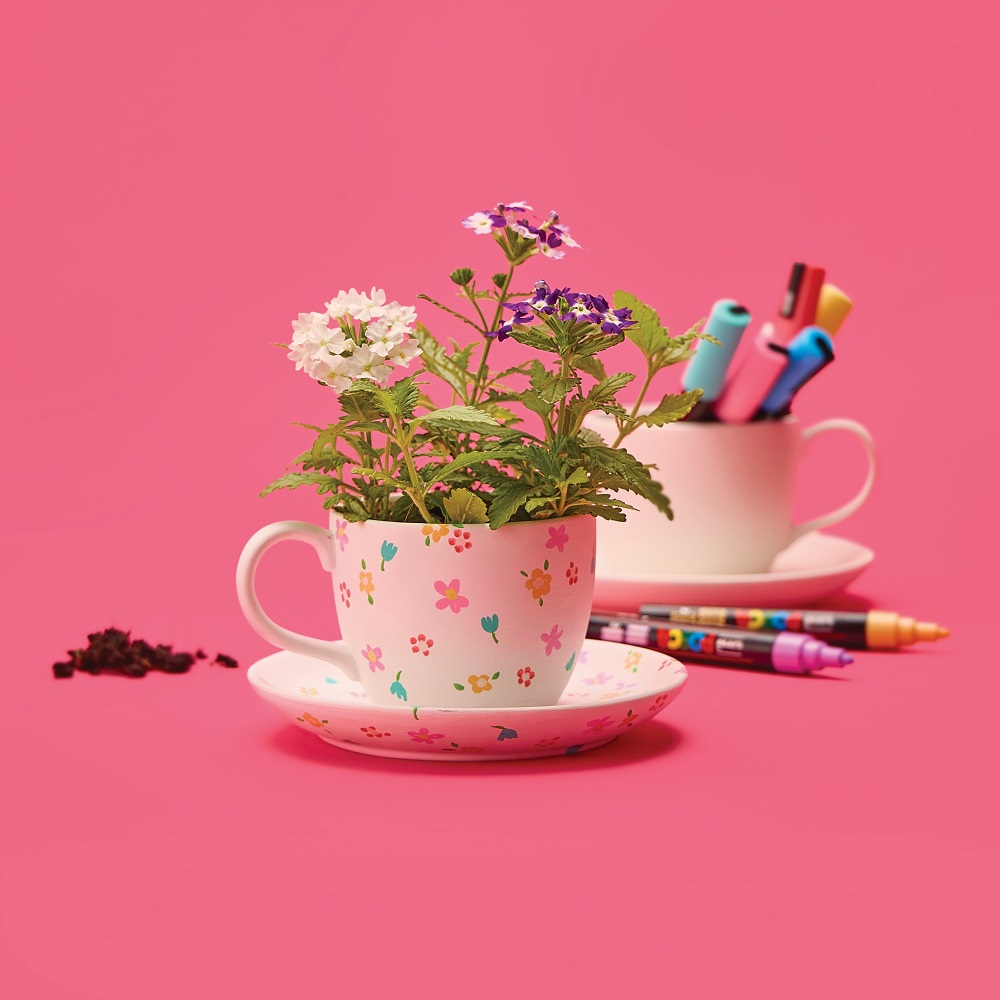
Keep Mother’s Day flourishing all year round with the Ceramic Teacup Planter. The plain smooth surface of the cup & saucer welcome personalisation with any combination of porcelain markers, POSCA pens, pastel paints or rhinestones. Decorate with a pattern, draw pretty pictures, or write down words of love for Mum. In whichever way you choose to customise your planter, it’s sure to have pride of place on the windowsill – and in Mum’s heart.  


STEP-BY-STEP  

  • Give your teacup & saucer a good wash and set aside to dry before applying paint or makers. 
  • Using the Porcelain Markers or paint of choice, carefully draw/paint your design onto the ceramic cup and saucer (paint provides a great overall coverage of colour, while markers provide precise detail). 
  • Set aside to dry thoroughly. 
  • To set the markers and paint for wear & tear, cover with a layer of Crystal Clear.  
  • Set aside to dry thoroughly. 
  • Add soil and a small plant of choice – flowers, herbs or succulents are ideal. 

Done! The perfect Teacup Planter for Mum is ready. 


*TOP TIP – Practising your design on paper before adding to the plate is a great help when deciding how the final product will look. 


Products Used;

Porcelain Teacup Planters 

Glass & Porcelain Markers 

POSCA Marker Pastel Bullet  

Creatistics Pastel Paint 

White Chromacryl Acrylic Paint 

Crystal Clear 


Sand Art Flower Magnets 


Sand Art Flower Magnets


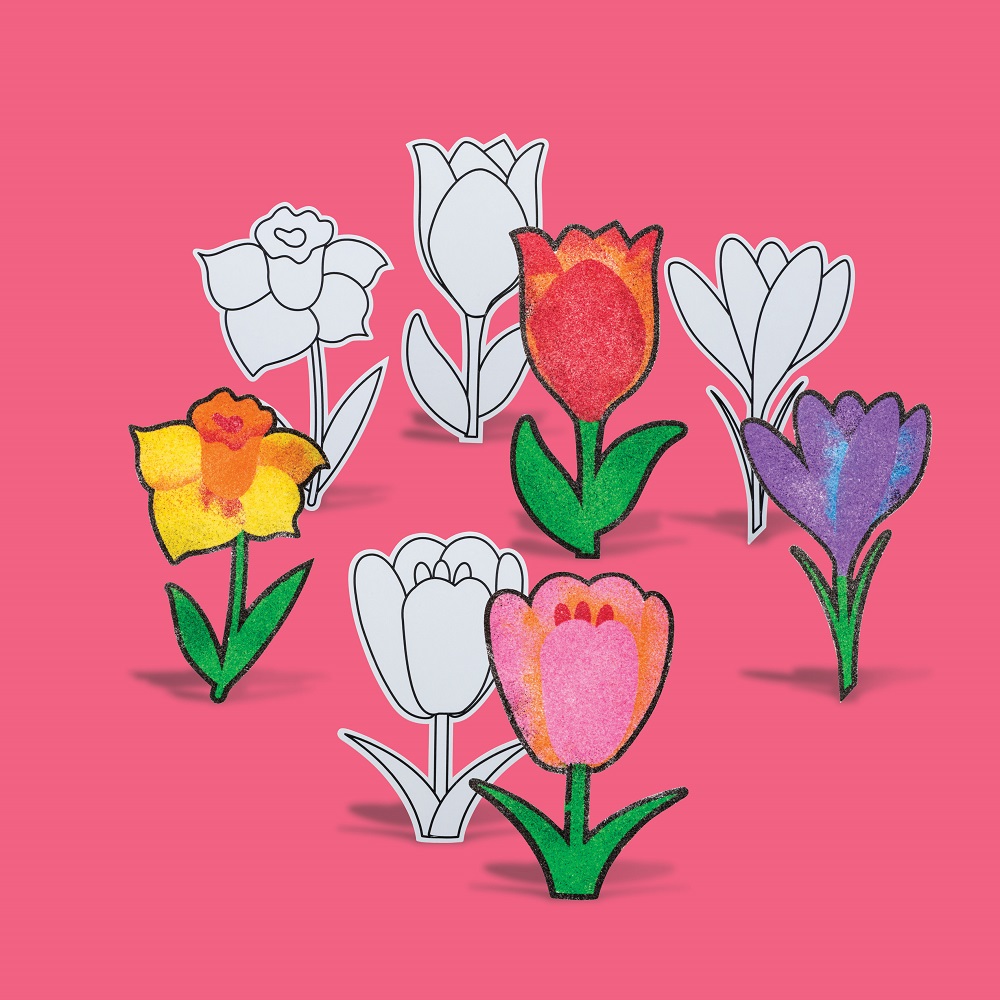
These beautiful pre-cut sand art flowers make for conveniently effective gifts that Mum’s are sure to treasure! Simply peel off the protective paper to reveal the sticky surface below for you to sprinkle sand over. As you work through the sections, you’ll see your flower blooming before your very eyes. The supplied magnets are perfect to stick your flower onto any magnetic surface – the fridge, dishwasher, Mum’s office computer etc. Now mum is reminded of her blooming treasures every time she sees her flower magnets. 

The Coloured sand used for crafting is available in a handy pack of 10, or choose to purchase individually in the pictured blue, purple, pink, red, orange, yellow and green. The rich vibrant shades are ideal for this project!  

Glitter shakers are super handy when it comes to applying the coloured sand too. They come with two types of pouring options from fine sprinkle to steady pour for easy application every time. Feel welcome to add a touch of Bio-glitter to the shakers for your flowers to shine bright!  


STEP-BY-STEP  

  • Choose your flower design and coloured sand. 
  • Carefully peel back a section of covering to reveal the sticky surface below.  
  • Pour or shake the sand onto the sticky surface until it’s covered, gently shaking off excess.  
  • Repeat steps 2 and 3 until the entire flower is covered with coloured sand.  
  • Attach the supplied magnet onto the back of the tulip.  

Done! The perfect sand art fridge magnet is for Mum is ready.  


*TOP TIP – Painting trays come in handy to catch the excess spill of sand so that it can be used – and avoid a sandy classroom!  


Products Used;

Sand Art Flowers 

Creatistics Coloured Sand 

Glitter Shakers 


Iron on Bead Frames 


Iron-On-Bead Frame


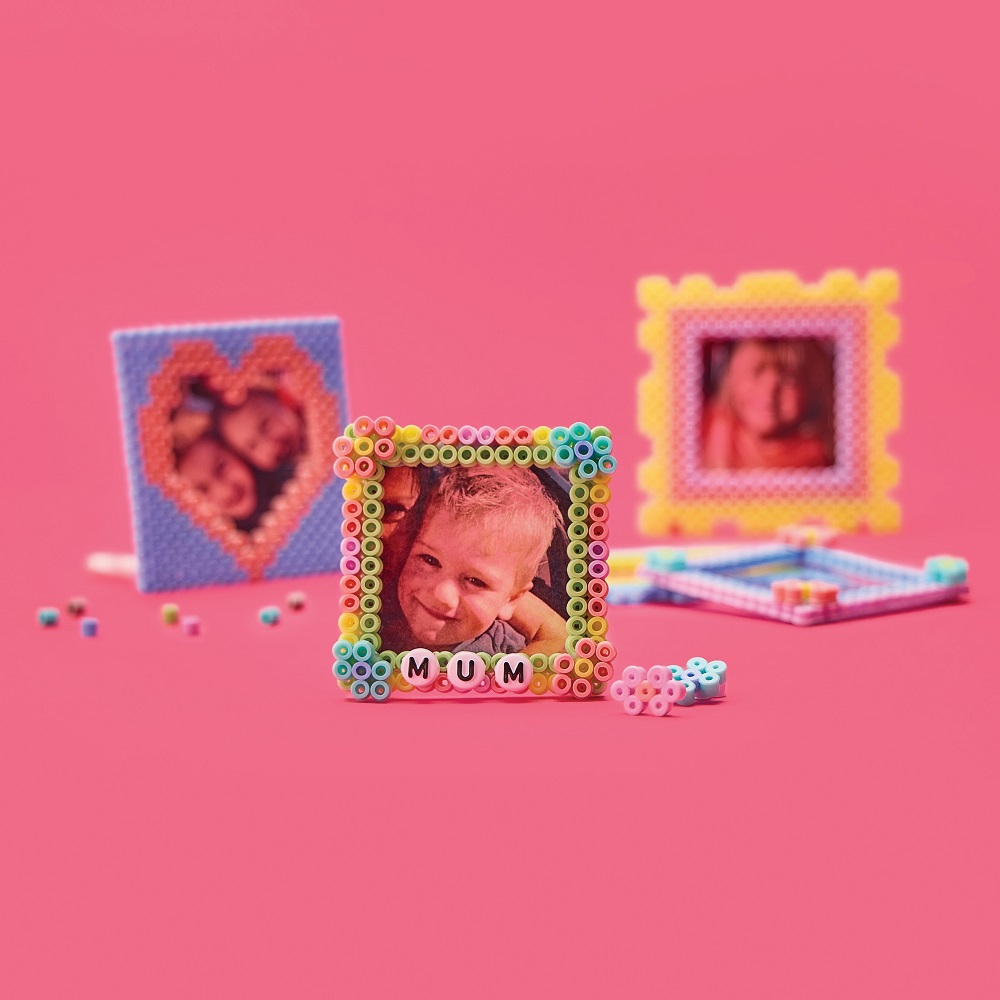
Iron on Beads welcome children to create. They work like open-ended craft materials, inviting children to arrange them into any number of shapes & patterns. Perfect to make jewellery or key tags, trinket bowls, coasters, embellishments and so much more – literally anything your imagination desires.  

Perfect for Mother’s Day these pastel-coloured non-toxic plastic beads easily arrange on a bead board; just lay on a piece of ironing paper and with a quick iron over, the beads melt together to hold their shape. It’s super easy! Children can also use them as traditional beads, stitching through the openings as they thread and weave – ideal for beaded jewellery or finishing off hanging decorations.  

Available in so many shades, choose from vibrant colours and the handy vibrant pack, pastel colours and the handy pastel pack or bright neon if you’re feeling like some flare. And for younger age groups, they might find the jumbo sized beads more workable along with their jumbo-sized square bead boards, or jumbo assorted shapes boards.  


STEP-BY-STEP  

  • Arrange the iron-on beads into a design on the bead board.  
  • Warm a household iron to high making sure the steam is off.  
  • Cover the design with a sheet of ironing paper and iron over until the beads start to melt and fuse together into a colourful and flexible shape. 
  • Allow your design to cool before removing from the bead board.  
  • Peel the protective layer off an acetate sheet and cut two pieces to the size of your frame.  
  • Sandwich a photo or drawing between the acetate sheets and glue layers together, then glue to the back of the frame.  
  • Set aside to dry thoroughly.  
  • When dry, peel an adhesive magnet from the sheet and attach to the back of the frame.  

Done! The perfect keepsake for Mum is ready.  


*TOP TIP – Hot irons are not for young children. Have an adult help or complete the ironing steps. 


Products Used;

Pastel Iron on Beads  

Ironing Paper for Iron on Beads  

Creatistics Square Bead Boards 

Tacky Glue 

A4 Acetate Sheets

Self-Adhesive Magnetic Sheets 


Stained Glass Flowers


Stain Glass Window Flowers


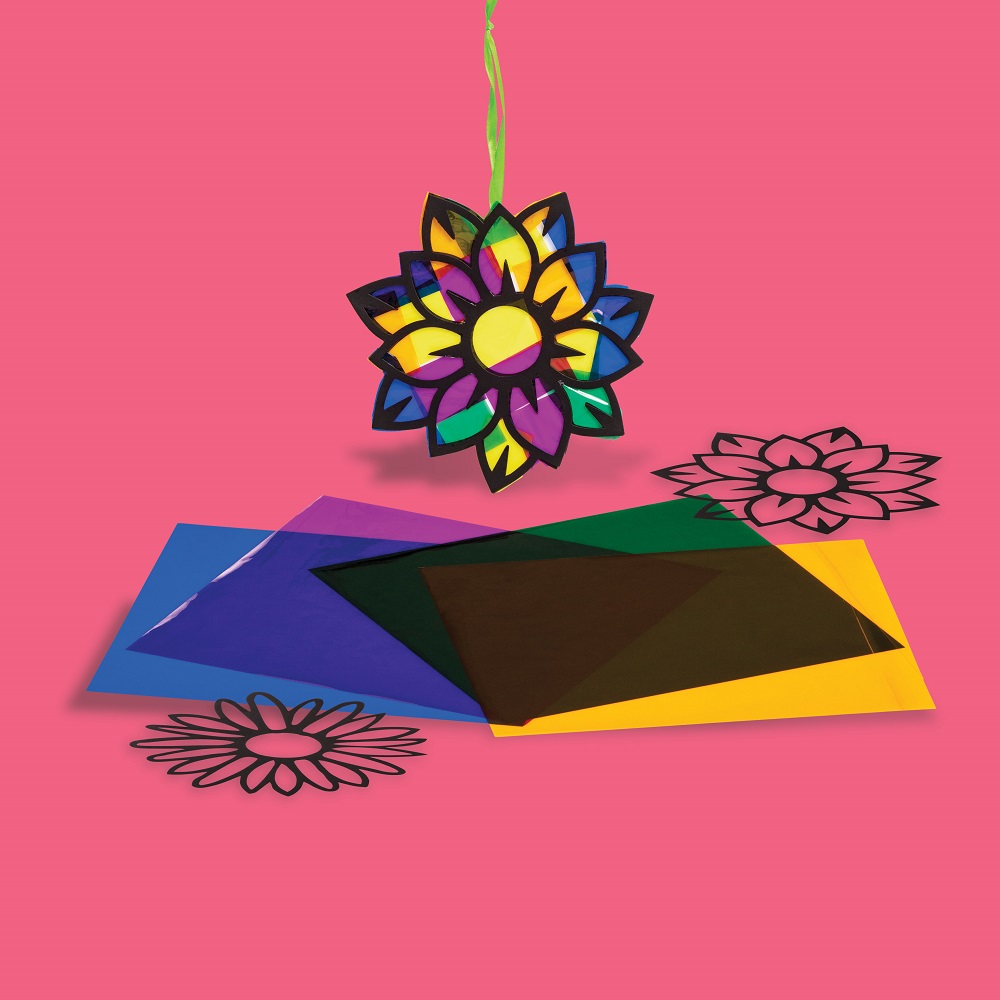
Take the hassle out of planning with pre-cut stained glass shapes ready to decorate. Made from black cardboard, these pretty flowers frame the included coloured cellophane beautifully. They even come with their own hanging ribbons. It’s a brilliantly convenient craft pack!  

Display on windows, use the ribbons to hang or stick onto greeting cards for handmade gifts that’ll surely bring a smile to Mum. These colourful flowers will last the test of time too– long after cut flowers have wilted these elegant creations will proudly blossom. 


STEP-BY-STEP  

  • Choose your flower design and gently press out the petal inserts. 
  • Apply a small amount of glue to one side of the flower (the edge of a glue stick or washable school glue will work with precision). 
  • Press the coloured cellophane onto the glue, snipping the pieces to size as desired. 
  • Use scissors to carefully snip off any excess cellophane from the edges of the flower. 
  • Use a tab of strong craft glue (or sticky tape) to attach the enclosed ribbon for hanging.  

Done! The perfect blooms are ready for Mum.  


*TOP TIP – Use glue sparingly, too much glue with lead to wrinkled cellophane. 


Products Used;

Stained Glass Flowers 

Creatistics Superstik Glue Stick  

Tacky Craft Glue  


Shrink Film Beaded Key Chain 


Shrink Film Key Chain


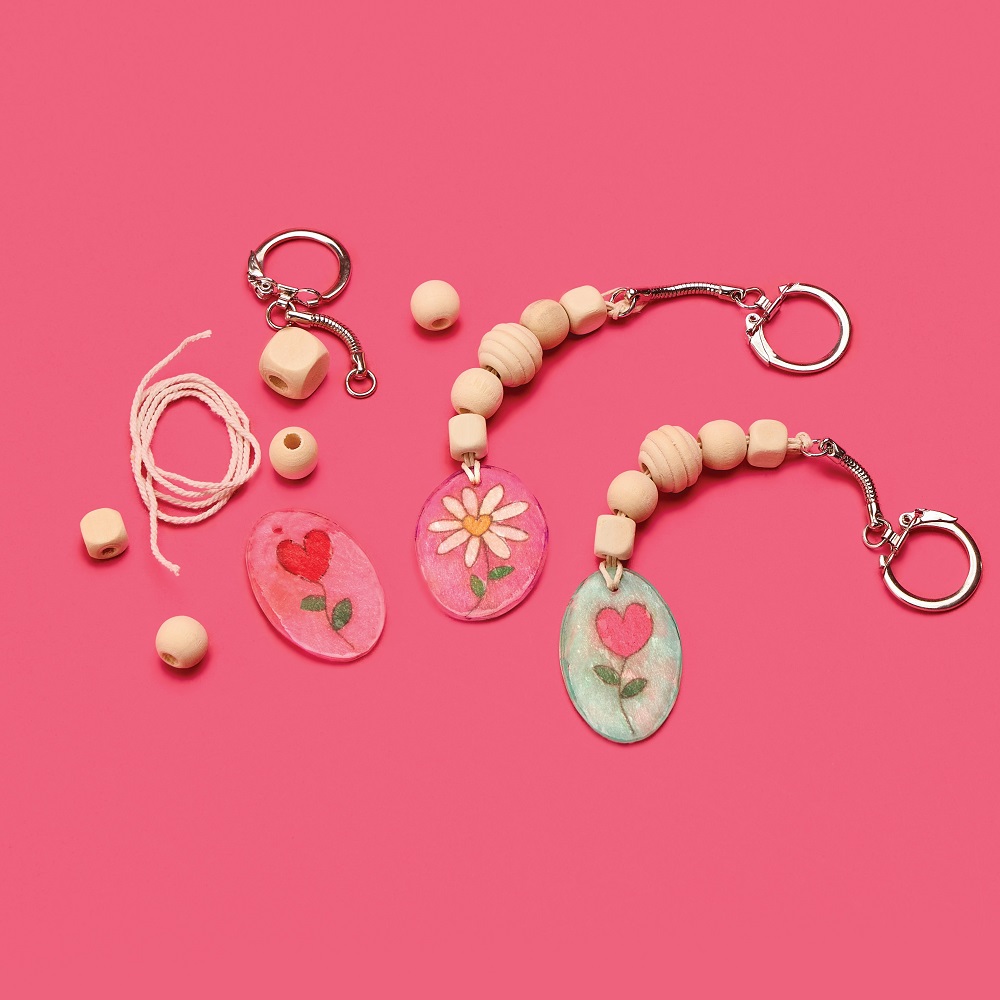
With her very own handmade key chain, Mum can take your love along with her all the time.  

Made using shrink film, this versatile medium works like drawing on a piece of paper – only so much more fun! When you’re finished with your design, simply cut it out, punch a hole in the top (to thread into), and bake in the oven. You’ll see your design shrink before your very eyes! When it’s completely cooled, you’ll see it’s now a durable hard trinket ready to transform into a myriad of things.  

Necklaces, bracelets, key chains, bag trinkets, car rear-view mirror accessories & door hanger decorations are all super simple to make. Just thread some beading cord or leather through the hole, add some beads and finish off with a key chain as desired. This is a gift that’s sure to last the distance. 


STEP-BY-STEP  

  • Draw keychain designs onto the shrink using the matte side with coloured pencils or permanent markers.  
  • Carefully cut around design and punch a hole to attach the beading cord. 
  • Pre-heat oven to 150°C. 
  • Place each design on a lined tray (matte side up) and bake.  
  • Plastic will begin to shrink after 10 seconds, watch carefully! They will shrink to approx. 60% of the original size.  
  • Remove from oven once plastic has flattened and set tray aside to cool completely before handling. 
  • Thread beading cord through the shrink film decorations and add desired number of beads. 
  • Firmly tie the cord onto the key chain to hold everything in place. 

Done! The perfect keychain for Mum is ready.  


*TOP TIP – Coloured pencil markings will darken in the oven; a very light shading is all that’s needed for bright vibrant colour! 


Products Used;

Clear Shrink Film 

Natural Beading Cord

Key Chain 

Natural Wooden Beads 

Paper Punch One Hole 


Hanging Porcelain Planter 


Hanging Porcelain Planter 

Perfect for growing creativity! These adorable porcelain planters are ideal to personalise for Mother’s Day. There are so many ways to decorate them! Pastel paint & felt feathers add calming shades to compliment Mum’s soon-to-be favourite plant, or bold & vibrant paint with glitter glue will surely brighten Mum’s day!  


STEP-BY-STEP  

  • Apply your chosen shade of paint to the porcelain planter and set aside to dry thoroughly. 
  • Decorate your planter using POSCA markers with words, drawings, or messages of love, and then set aside to dry. 
  • Spray on a layer of Crystal Clear to protect from the weather and wear & tear. 
  • Use tacky glue to stick on your desired embellishments and set aside to dry once more.  
  • Add soil and a plant of your choice (flowers, herbs or succulents work well).  

Done! The perfect planter is ready for Mum.  


*TOP TIP – Before applying paint, markers, or embellishments, it’s recommended to thoroughly wash the porcelain planter and set aside to dry.   


Products Used;

Hanging Porcelain Planter 

Creatistics Pastel Paint 

POSCA Marker Pastel Bullet 


Pencil Holder Frame  


Wooden Pencil Holder


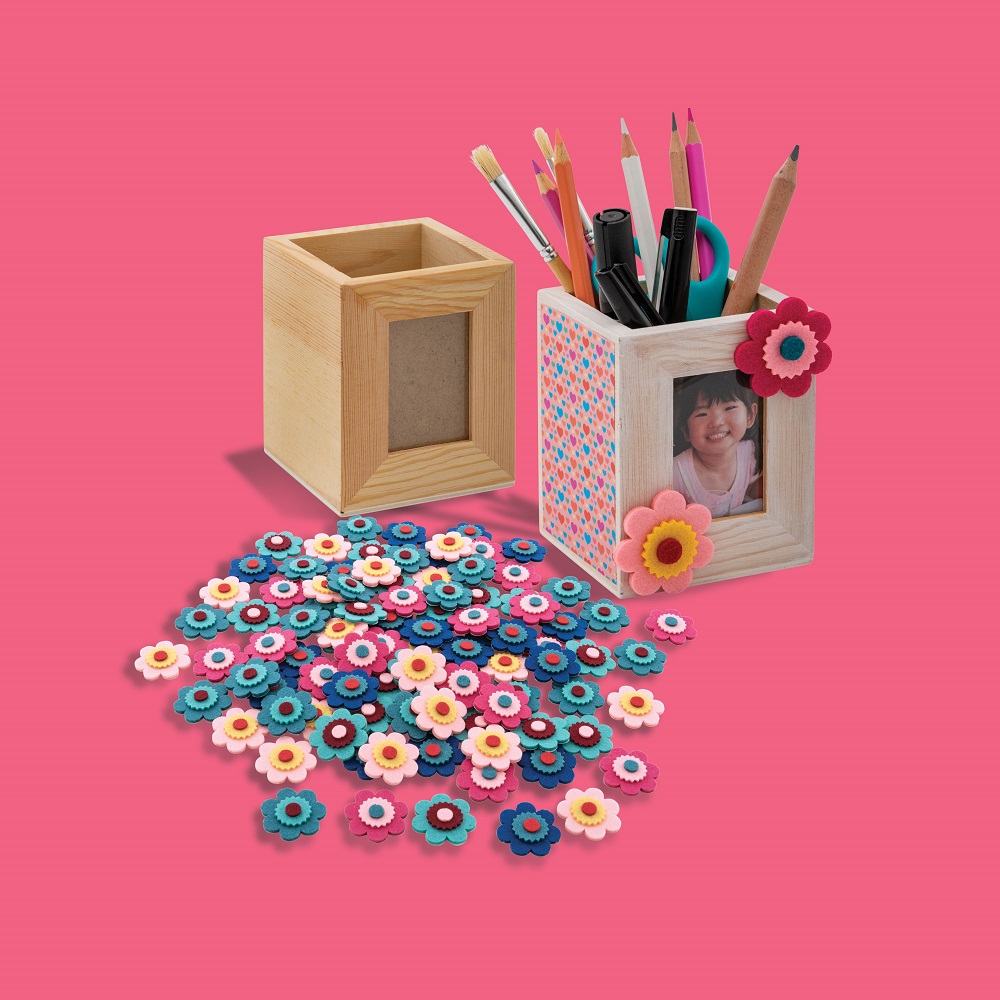
This Mother’s Day keepsake is not only beautiful, its wonderfully functional too. Decorate the pine wood pencil holder and PVC frame for stationery to sit proudly on Mum’s desk as a reminder of a special occasion for years to come.  

Perfect to decorate with pastel paint and special papers (Mother’s Day, Impressionist or Patterned) and then finished off with the cutest accent embellishments (Flowers, Feathers, Wooden MUM Tiles, Glittery Daisies or Flower Rhinestones). Follow the simple step-by-step guide below to assemble yours. The only tough choice here is, how will you decorate yours? 


STEP-BY-STEP  

  • Remove the PVC display frame from the wooden pencil holder and set aside. 
  • Using a brush, apply paint to your pencil holder and set aside to dry.  
  • To cover some of the sides with patterned paper, lay the pencil holder onto the paper and use a pencil to trace around. 
  • Lift the pencil holder off the paper, and using scissors, cut around the pencil markings (snipping inside of the pencil markings will ensure the paper fits neatly in place).  
  • Apply a layer of Superstik Glue Stick to the surface of the pencil holder you’re wanting to place the paper on, and then firmly press the paper onto the surface, using your hands to smooth it down.  
  • Repeat steps 3 to 5 for as many sides of the holder as desired (children’s drawings on cover paper also make a beautiful alternative to patterned paper).  
  • Use dabs of Tacky Glue to apply your choice of embellishments and set aside to dry.  
  • For the display frame, print and cut-to-size a photograph or child’s drawing, and gently slot it into place along with the PVC frame.  

Done! Mum’s perfect pencil holder is ready.  


*TOP TIP – Several layers of paint will provide complete coverage, while paint thinned with water will provide a rustic whitewashed effect.  


Products Used;

Pencil Holder Frame 

Felt Flowers

Creatistics Pastel Paint 

Tacky Glue 


Personalised Latte Mugs 


Personalised Latte Mug


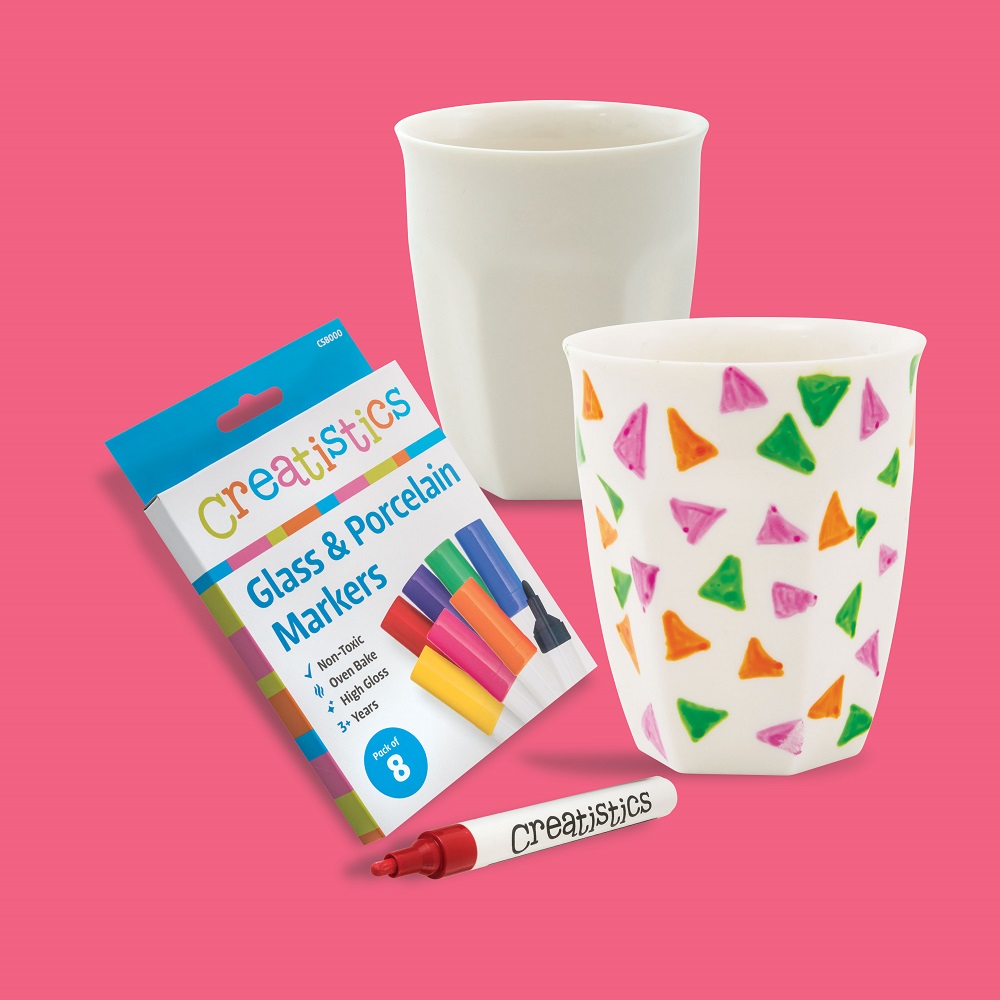
A one-of-a-kind latte mug is just perfect to remind Mum how loved she is. Whether she’s gearing up for a big day ahead, or ready to relax at the end of it, her very own personalised will be Mum’s go-to favourite cup! These beautiful mugs are supplied as plain white, providing the perfect canvas for children to decorate and personalise with drawings and messages.  


STEP-BY-STEP  

  • For best results, we recommend to thoroughly clean your mug with soapy water, giving them a good rinse and dry afterwards (a dishwater is ideal). 
  • Draw or paint your desired designs onto the outside of the mug. 
  • Set aside to dry thoroughly.  
  • To set the mug ready for drinking, wear & tear and dishwasher use it will need to be baked in an oven. Set oven to 150 degrees C, and once oven temp has been reached, bake the mug for 30 minutes, turn oven off and allow to cool before removing.  

Done! The perfect latte mug is ready.  


*TOP TIP – Paint provides a great overall coverage of colour, while porcelain markers provide precise detail. 


Products Used;

Latte Mugs & Marker Value Pack 

Glass & Porcelain Markers 

Akwa Glass & Tile Paint 


Love Heart Tie Dye Calico Bag 


Love Heart Tie Dye Calico Bag


Tie-Dye (or tied dying) is an ancient art that’s been well-known across continents and cultures for thousands of years. It’s made a modern resurgence with plenty of colourful textile designs to experiment with. All that’s needed is fabric, coloured dyes, and string – although modern tie dye is made a breeze with the use of rubber bands. 

Choose any number of coloured dyes in vibrant rainbow and bright fluorescent shades or keep to the pictured warm colour tones of purple, magenta, red, orange, and yellow and you’re all ready to start! It’s the position of the rubber bands wound tightly around the fabric that creates the unique and mesmerising result. Creatistics Tie Dye takes the hassle out of the process too! No need for messy salt & vinegar and tubs of water, simply apply the coloured dye straight from the bottle onto the fabric.  

Whichever collected of shades and pattern of rubber bands you choose; Mum’s shopping bag will be the envy of every shopper!  


STEP-BY-STEP  

  • Soak your calico bag in cold water and wring out the excess water.  
  • Fold your damp calico bag vertically in half.  
  • Use a Creatistics Colouring Marker to draw a half-heart shape with the centre aligning on the fold (washable markers will come off when you put the bag in the washing machine). 
  • Scrunch the bag with tight pleats following along the marker line, matching up the marking together, and tightly wrap a rubber band around the pleats on the marker line.  
  • Add another rubber band approx. 4cm below the first one.  
  • Keep adding rubber bands until you reach the length of the bag.  
  • Wearing gloves, apply Creatistics Tie Dye straight from the bottle onto the fabric bag, a new colour for each banded section, covering the entire surface.  
  • Place the calico bag into a plastic bag or alternative plastic wrap.  
  • Let sit for a few hours in a cool damp place (a fridge is ideal).  
  • Remove the fabric bag from the plastic bag and remove the rubber bands (carefully cutting away with scissors is ideal).  
  • Hang the calico bag on the clothesline and allow it to air dry.  
  • Once thoroughly dry, place the calico bag in a dryer for 5-10 minutes on a hot spin setting to enable the colours to fully bind (we also recommend to separately wash the bag 3 to 4 times before washing with other laundry to avoid running).  

Done! The perfect carry bag for Mum is ready.  


*TOP TIP – Educators and older students will find applying the dye straight from the bottle the easiest methods, however younger age groups may find it easier to apply the dye from a bowl with a brush.  


Products Used;

Calico Bags

Creatistics Tie Dye

Creatistics Chunky Colouring Markers 

Rubber Bands 


Shrink Film Jewellery 


Shrink Film Jewellery


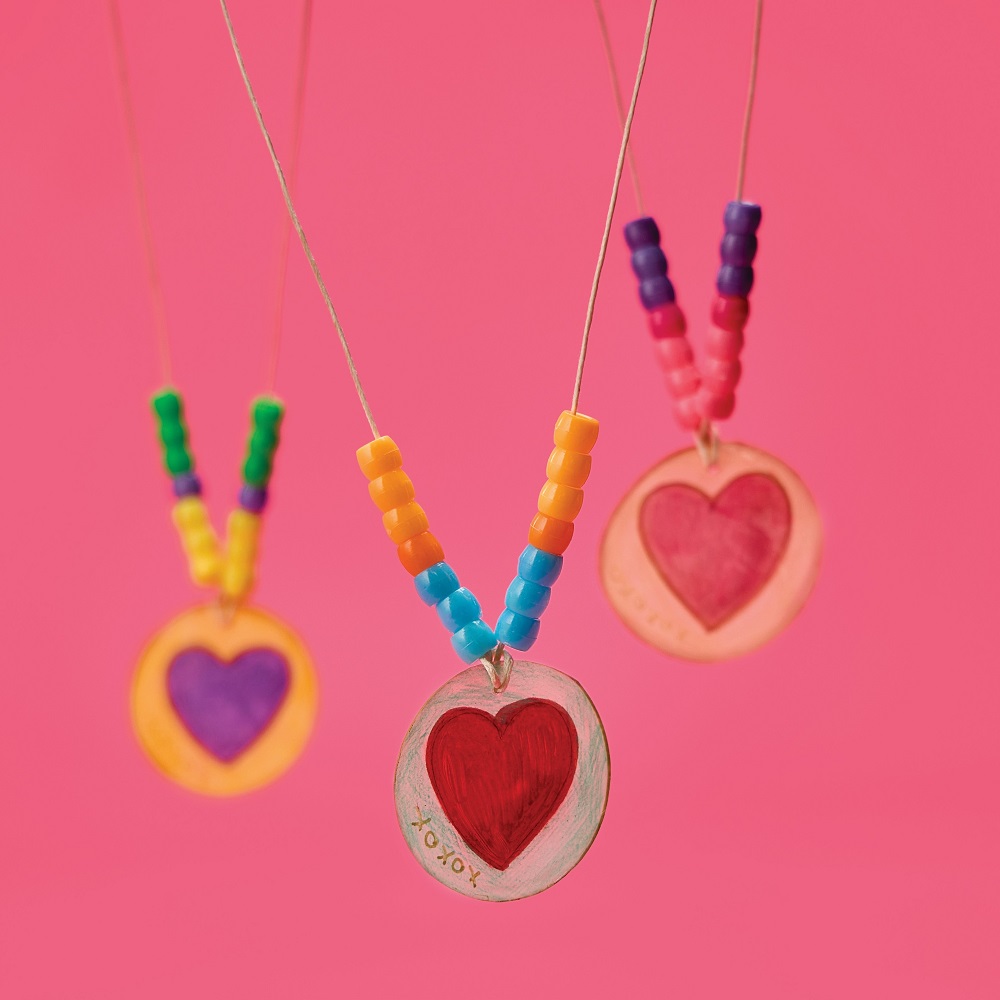
Just like the key chain earlier, shrink film jewellery makes beautifully memorable keepsakes and yet they’re easy-peasy to assemble. With just a few simple items and a touch of creativity, in no time at all Mums around the country can proudly sport their Mother’s Day jewellery.  

Whether you choose clear shrink film, printable white or pre-cut charms, young creators will have free reign to design the perfect adornments for their mums and much-loved role models. Read on to follow through the steps to make the colourful pictured pendants.  


STEP-BY-STEP  

  • Draw jewellery designs onto the shrink film using the matte side with coloured pencils or permanent markers.  
  • Carefully cut around design and punch a hole to thread through.  
  • Pre-heat oven to 150°C. 
  • Place each design on a lined tray (matte side up) and bake.  
  • Plastic will begin to shrink after 10 seconds, watch carefully! They will shrink to approx. 60% of the original size.  
  • Remove from oven once plastic has flattened and set tray aside to cool completely before handling. 
  • Thread beading cord through the shrink film decorations and add desired number of beads. 
  • Firmly tie the cord to hold everything in place, leaving enough room to fit a bracelet or necklace on as desired. 

Done! The perfect jewellery for Mum is ready. 


*TOP TIP – Coloured pencil markings will darken in the oven; a very light shading is all that’s needed for bright vibrant colour! 


Products Used;

Clear Shrink Film 

Natural Beading Cord 

Coloured Pony Beads 

Natural Wooden Beads

Paper Punch One Hole


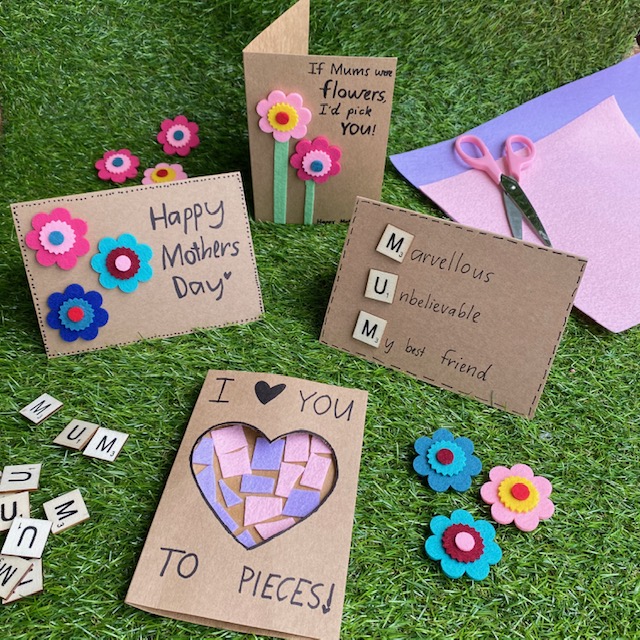
Scratch Art Greeting Cards 


Scratch Heart Cards


DIY Mother’s Day cards are perfect for children to use their creativity in imaginative ways to make something just right for their Mum. A thoughtful and loving message inside the card will be something Mum will hold in her heart forever. 

And because they’re so quick and simple to make, they’ll be time for children to make a card for all their role models & friends – mums, step-mums, grandmas, aunties, the kind neighbour always offering a friendly wave… Why not get the class together to send kind messages to the residents at the local retirement village? These beautiful cards will make anyone’s day!   


STEP-BY-STEP  

  • Using the provided scratch tools scratch away the black surface of a scratch-art heart to reveal the colour gradient below. It could be a special message with words, drawings or pretty patterns.  
  • To make the coloured card front, apply a small layer of glue stick to the front of the card and lay it onto a piece of coloured paper. 
  • Cut away excess paper. 
  • Apply the glue stick to the back of the scratch-art heart and firmly press onto the font of the greeting card.  
  • Set aside to dry thoroughly if needed.  
  • Draw and write loving messages inside.  

Done! Mum’s perfect Mother’s Day card is ready.  


*TOP TIP – Don’t forget the envelope! It’s a terrific space for children to personalise with drawings, stickers or embellishments.  


Products Used;

Scratch Art Hearts & Cards Pack

Hot & Cold Coloured Paper


Alphabet & Number Stamps  


Alphabet & Number Stamps


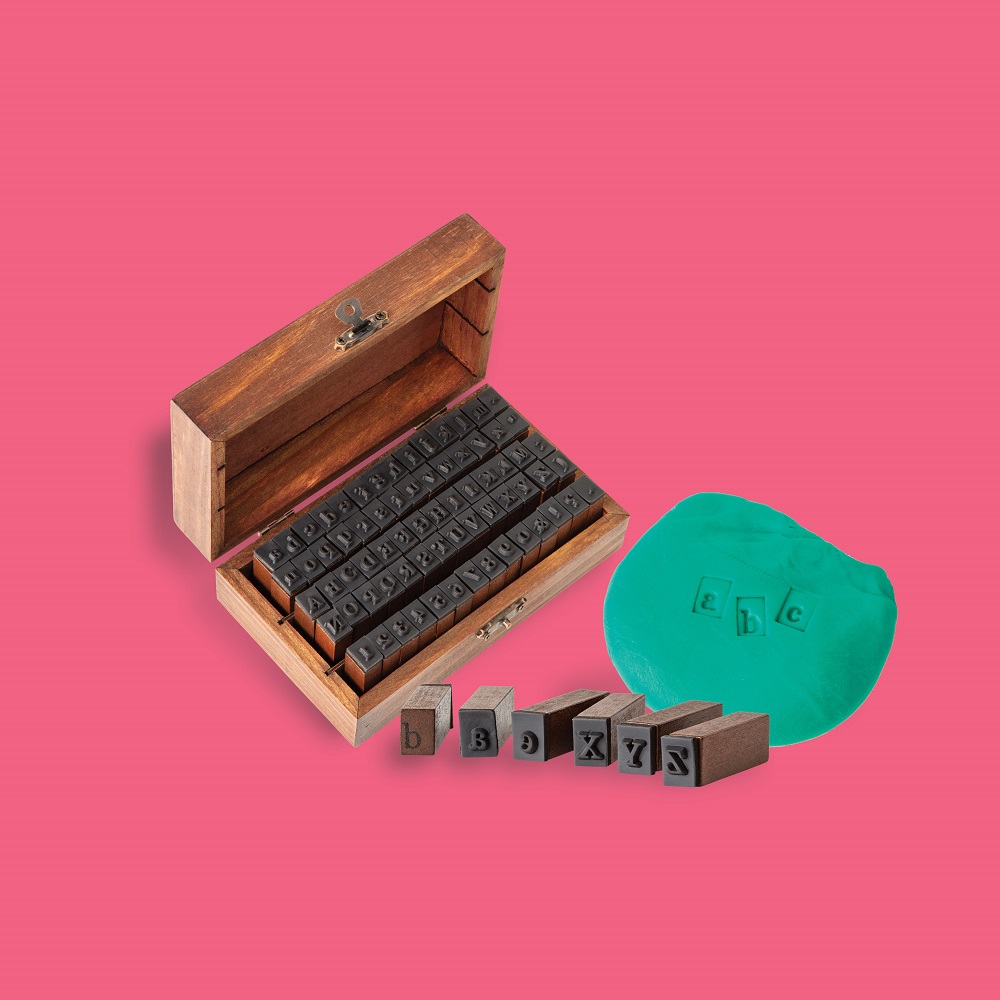
Perfect to incorporate printmaking into arts & crafts, this traditional alphabet & number stamp set will print messages of love into all sorts of mediums. Whether they’re used with ink on cards, or stamped into paper Magiclay, silk clay and air dry clay your creations will have that extra special touch this Mother’s Day.  


STEP-BY-STEP  

  • With a rolling pin, roll out your chosen clay medium to create a smooth surface.  
  • Use a cookie cutter or free form your clay in your desired shape, eg. Necklace pendants, trinket bowls, key chains, tea light holders, desk paper weights etc.  
  • Gently press the letters/numbers into the clay, forming messages of love, eg. ‘MUM’, ‘XOXO’, ‘BEST MUM’ etc.   
  • Set your works aside to thoroughly dry (don’t forget to poke a hole in your works if you’ll be threading leather or cord to hang). 

Done! The perfect message for mum is ready.  


*TOP TIP – A sprinkle of Bio-Glitter always adds a touch of sparkle to Mum’s present. 


Products Used;

Alphabet & Number Stamps


Now that your craft supplies are organised, have you got your wrapping sorted? 

For large presents tissue paper, cellophane or paper rolls that can be personalised with paintings or drawings are ideal. For small items, paper bags are perfect, available in festive polka dots or easy-to- personalise natural or white.  Finish off with ribbons made with satin, raffia or jute and you’ll be all set for Mum’s special day.  


Now it’s time to gather the class and get your craft on!  


Download our Mother’s Day activities PDF Bundle

Blog Home>

Shop MTA>

Posted on

9 Memorable Father’s Day Art & Craft Activities

Father's Day Craft Leaderboard

Fathers, Grandfathers, Great Grandfathers, Stepfathers, Uncles, Brothers and all other loving father figures in the community will love to open a personalised handmade present- representing the love and gratitude we feel for them and to celebrate all they do for us each day.

The beauty of MTA’s open-ended range of Father’s Day materials is the ability for children to adapt them to their own needs & suitability – making a personalised treasure that’s just right for their role models.

Whether in the school classroom, early education setting, home-based learning or weekend crafting – there’s something for everyone in MTA’s NEW and best-selling Father’s Day art & craft resource collection.

Read on for some creative Father’s Day-themed activities to make Dad feel special.


1. AIR DRY CLAY BOWLS

Father's Day Air Dry Clay Bowl Project

Air Dry Clay is wonderfully versatile, allowing young hands to easily mould into all sorts of treasures – including small plates and bowls to act as desktop paperweights or handy holders for keys, coins, wedding rings, and cufflinks etc. These beautiful keepsakes will be held in Dad’s heart as they hold his keys!


HAND BOWL STEP BY STEP

  1. Divide Air Dry Clay into roughly 8 portions
  2. Using a rolling pin, roll out each portion to roughly 1cm thick
  3. Place the child’s hand onto the clay and gently trace around using clay tools
  4. Gently cut away excess clay with a clay knife
  5. Lift hand print off the messy mat and smooth down any rough edges by gently pressing with fingers
  6. Set aside to dry for a few days
  7. Decorate with paint as desired and leave to dry
  8. When completely dry, coat with PVA Washable School Glue  or Crystal Clear  to provide a barrier to dirt, tarnish, wear stains and moisture.

*TOP TIP – placing the handprint in a small bowl lined with a paper towel while it dries will ensure it hardens into a shallow bowl shape.

Featured Products;

White Creatistics Air Dry Clay Ceramic Clay –  (one packet does about 8 little hands)

Glass & Ceramic Paint

Crystal Clear  OR Creatistics PVA Washable School Glue


2. WOODEN HANGING FRAME

No 1 dad wooden hanging photo frame

Perfect for home, Dad’s office, the tool shed, or garden shed, Wooden Hanging Frames are perfect for children to decorate and add their own style. Use paint,  patterned, papermarkers or embellishments  to personalise and then add a photo or drawing to each of the different-sized frames. When your paint and glue has dried, each square frame is ready to be strung together using the handy pre-cut holes.


TO MAKE DAD ROSETTE

  1. Fold paper square into 4 lengths and cut along each fold – you will have 4 x long rectangle lengths
  2. Fold each rectangle length into a paper concertina (fold the strip back and forth along the length of the paper).
  3. Repeat for all 4 lengths of paper
  4. Glue the ends of the concertina sections to each other, alternating paper pattern. You will now have 1 long concertina.
  5. Bring 2 edges of the concertina together and glue in place to make a circle
  6. Cut two lengths of patterned paper into ribbons and apply glue to the top, attach to the back of the rosette.
  7. Cut a circle out of carboard, smaller in diameter to your rosette.
  8. Using a metallic marker, write #1 Dad, BEST DAD AWARD, or desired quote
  9. Use a thin permanent marker to trace around the metallic letters for crisp & clear lettering
  10. Apply an even layer of PVA glue to the back of the cardboard circle and lay it over the front of the concertina circle, apply pressure to the layers while drying (laying a book over the rosette will help it to dry flat).
  11. When dry, attach to the frame with a good dab of PVA glue

*TOP TIP – Low melt Hot Glue Guns will glue the rosette components together quickly for older age groups, or educators.


Featured products;

Blue Gingham Paper Roll

A4 Coastal Cardboard 220gsm

Hanging Frame

Pattern Paper Squares

Leather Cord

Creatistics Strong Craft Glue

Creatistics Superstick Glue Stick

Metallic Markers


3. LATTE MUG

Best dad ever latte mug craft project

Whether Dad is gearing up for a big day ahead, or ready to relax after a long day, a personalised Latte Mug will be Dad’s go-to favourite cup! These beautiful mugs are supplied as plain white, providing the perfect canvas for children to decorate and personalise with drawings and messages to remind Dad how loved he is.

To set the markers and paint for wear & tear and dishwasher use, the mug will need to be baked in an oven. Set oven to 150 degrees C, once oven temperature has been reached, bake mug for 30 minutes, turn the oven off and allow to cool before removing. Dad’s mug is now ready for his favourite hot beverage.

*TOP TIP – Paint provides great overall coverage of colour, while porcelain markers provide precise detail.


Featured products;

Latte Mugs

Glass & Porcelain Markers

Glass & Ceramic Paint


4. DAD ROCKS

Dad Rocks craft project

Painting rocks is a simple and fun craft idea that’s recently become popular the world over – with this adorable Father’s Day version sure to delight! You’ll want a smooth and clean stone, thick acrylic paint and heavy-duty markers to decorate your Dad Rocks. A few base coats of paint will provide the ideal surface on which to draw a likeness of Dad, a positive message on the back or a funny rock-themed quote – be as creative as you like! A coat of PVA glue or Crystal Clear will provide a protective surface for general wear and tear. Dad’s rock is now ready to find in a treasure hunt, to brighten the garden path or to keep loose papers secure as a desk paperweight. Dad will always know he rocks!

*TOP TIP – A quick wash with warm soapy water before decorating will give a clean surface for paint and markers to adhere to your rocks.


Featured products;

Story Stones

Glass & Porcelain Markers

Thinline Permanent Markers

Acrylic Paint Introductory Set

Crystal Clear  OR Creatistics PVA Washable School Glue


5. FATHER’S DAY CARDS

Fathers Day Card Craft Project

DIY Father’s Day cards make light work out of present making – perfect for children to use a wide range of open-ended materials in imaginative ways to make something just right for their Dad. A thoughtful and loving message inside the card will be something Dad will hold in his heart forever. If you’re feeling like some creative card inspo, have a read on to follow the step-by-step guides to making a Dad Shirt card or a Patty Pan Award card.

DAD SHIRT CARD – Step by Step

  1. To make the shirt front, apply glue to the front of the card and lay it onto the back of the gingham paper (the white side)
  2. Cut away excess paper
  3. To make the tie, select your desired colour of patterned paper and cut into a tie shape (narrow at the top, wide at the bottom with a V shape)
  4. Glue tie in the centre of the shirt front card
  5. To make the collar, apply glue to a length of cover paper and lay it onto the back of the gingham paper (the white side) and cut away excess to make your desired collar size
  6. Fold the 2 sides of the collar length around to make the front corners of your collar (this is where the buttons will go)
  7. Glue buttons in place onto the shirt front
  8. Decorate the inside of the card with drawings and messages
  9. Your card is ready for Dad!

*TOP TIP – To make the collar lengths apply glue stick to an entire piece of cover paper and lay onto the gingham paper, you will then be able to cut multiple strips of collars at the one time.


PATTY PAN AWARD CARD – Step by Step

  1. Cut a circle out of coloured cardboard
  2. Draw or write your message for Dad using markers
  3. Cut patty pans into quarters
  4. Glue sections of patty pans onto the back of the cardboard circle to form the Rosette (experiment with colour patterns, or multiple layers)
  5. Cut 2 lengths of coloured paper or cardboard & cut an inverted V shape into the lower lengths to form the Rosette ribbons
  6. Attach you ribbons onto the back of the rosette with glue
  7. Apply a layer of glue to the back of the finished rosette and press down firmly onto the card
  8. The inside of the card can be decorated with drawings and messages too!
  9. Slot your card into the supplied envelope and it’s ready for Dad!

*TOP TIP – The front of the card where the patty pan award sits can also be decorated with paint, drawings or coloured paper for an extra splash of colour!


Featured products;

White Cards and Envelopes

Pastel Assorted Buttons

Blue Gingham Paper Roll

Pattern Paper Squares

Creatistics A4 White Cover Paper 

Large Coloured Patty Pans

A4 Coastal Cardboard

Metallic Markers

Thinline Permanent Markers


6. SHRINK FILM BOOKMARKS

Best Dad Shrink Film Bookmarks craft project

With just a few supplies and a lot of imagination, these handy bookmarks are super simple to make, and will remind Dad how special he is with each turn of a page.

To make, simply cut a length of clear shrink film  or printable shrink film ) (one sheet of shrink film makes 4 bookmarks). Draw or write your design onto the matt side using coloured pencils  or markers , use a hole punch to make a hole for threading the string later on – and then you’re ready to bake! Pre-heat the oven to 150 degrees C. Place design on a lined tray (matt side up) and bake. The plastic will begin to shrink after 10 seconds. Remove from the oven once the plastic has flattened and set tray aside to cool completely before handling.

To make the beads, roll small chunks of silk clay  or paper magiclay ( in the palm of your hand) to form small beads. Poke each bead with a skewer all the way through, making sure the hole is wide enough to thread cord or string through and then set aside to dry for 24 hours. Use a length of strong string (or leather cord ) to tie through the punched hole, add some of your colourful beads and tie off with a coloured tassel . Your personalised bookmark will mark reading places proudly!

*TOP TIP – Coloured pencil markings go a long way once shrunk in the oven; a very light shading is all that’s needed for bright vibrant colour!


Featured products;

Clear Shrink Film  (Each sheet of clear film paper makes roughly 2 car hangers).

White Printable Shrink Film

Jumbo Coloured Pencils

Lyra Giant Skintone Pencils

Thinline Permanent Markers

Candy Colours Paper Magiclay

Paper Punch One Hole

Leather Cord

Assorted Colour Tassels


7. CERAMIC PLANT POT with PLANT LABEL/STAKE

Dad themed CERAMIC PLANT POT with PLANT LABEL craft project

Plants truly are the gift that keeps on giving! Whether your Dad would like a spiky cactus to decorate his office or a tasty bunch of herbs to spice up his cooking, he’ll no doubt love a personalised plant to keep him thriving.

These adorable ceramic plant pots make the perfect vessel to decorate with glass & ceramic paint  and porcelain markers. We’ve added a little shrink film plant label for further personalisation, which makes the ideal tag to jot down the care instructions for Dad’s plant.


*TOP TIP – Paint provides great overall coverage of colour, while markers provide precise detail.


Featured products;

Porcelain Flower Pot OR  Terracotta Plant Pot

Glass & Porcelain Markers

Glass & Ceramic Paint

Jumbo Coloured Pencils

Clear Shrink Film

White Printable Shrink Film

Thinline Permanent Markers Assorted Pack


8. WOODEN HOME FRAME

WOODEN HOME FRAME craft project

Home is where the heart is, and what a beautiful home these wooden frames make! The sturdy surfaces of the wooden frames are ideal for all sorts of personalised decorations including open-ended Father’s Day essentials or silk clay . When your frame has been decorated and thoroughly dry it’s ready for a photo, drawing or special message to be added into the frame. You’re then ready to slot the wooden stand into the back of the frame so it can sit proudly on Dad’s desk where we’re sure it will stay forever!

*TOP TIP – Remember to add the date to the back of your Home Frame so Dad can remember what year it was when he looks back at his treasured memories.


Featured products;

Wooden Home Frame

Silk Clay Kit

Candy Colours Paper Magiclay 

 Father’s Day Craft Essentials


9. AIR DRY CLAY DECORATIONS

These sweet decorations will bring a smile to Dad’s face every time he sees them. For younger children, the design can be kept straightforward and simple lettering, with older age groups adding complexity to their designs with messages, carving decorations or clay beads.

To make, simply roll out a slab of air-dry clay and use cookie cutters  or free-form tools to cut out your desired shape. Set aside to dry for 24 to 48 hours on a flat surface. Meanwhile, to make the beads, roll small chunks of clay , silk clay  or paper magiclay  in the palm of your hand to form small beads. Poke each bead with a skewer all the way through, making sure the hole is wide enough to thread cord or string through and then set aside to dry with the decoration. When the clay is firm to the touch it’s ready for painting. When your decorations are dry once again, they’re ready for stringing together – remember to tie them off well to keep those beads from rolling away!

*TOP TIP – The thicker your decorations are, the sturdier they will be able to withstand general wear and tear. A few coats of PVA glue will also provide strength to your decorations for added longevity.


Featured products;

Creatistics Air Dry Clay Ceramic Clay – (one packet does about 8 little hands)

Glass & Ceramic Paint

Creatistics PVA Washable School Glue

Silk Clay Kit

Candy Colours Paper Magiclay 

Leather Cord


Whether it’s a Dad, Grandpa, Stepdad, Brother or a cherished father figure you’d like to spoil, MTA has you covered with all sorts of treasures waiting to be personalised with your love.


*All these activities can be modified and adapted to suit different age groups, taking away small parts for children under 3 years of age and replacing them with larger safe parts. Where scissors are used, educators may use adequate supervision to suit the needs of the children or offer pre-cut shapes. Where glue guns are used, educators may substitute with a safer alternative such as washable PVA glue.


Which one is your favourite?


Blog Home> 

Shop MTA>


Posted on

Mother’s Day; Craft Ideas For Kids

Mother's Day Craft Ideas for Kids Preview

Mother’s Day is just around the corner and there are lots of teachers and educators searching for the perfect gift idea for the students in their class to make for the special mother figures in their lives. If you’re looking for fun and cute Mother’s Day craft ideas for kids, then you have come to the right place! There is something so special about handmade gifts from children that mothers really treasure. Read on to find out some of my favourite craft ideas for kids to make for Mother’s Day.

Wooden Hanging Heart Frames

Wooden Hanging Frames art activity on grass background

I love these Wooden Hanging Heart Frames because of their versatility, there is so much you can do with them! Whether you’re leaving them plain for a more natural look or painting them with pastel paints, these frames are bound to look beautiful. If you’re leaving them plain, they look really nice paired with brown cardboard, ‘MUM’ tiles and plain wooden beads. If you’re after something a bit more colourful, using pastel paints to paint over the MDF wood is the way to go. Once dry, embellishing these with coloured cardboard showcasing drawings and special messages inside the love heart frame looks really sweet. Alternatively, adding a little extra sparkle with biodegradable glitter or pastel sequins also looks great! Finish off these Wooden Hanging Heart Frames by tying on a pipe cleaner so that these beautiful gifts can be proudly hung somewhere special for Mum to always see.

MTA Product Used:
Wooden Hanging Heart Frames
Pastel Paints
Pastel Crate Craft Kit
Wooden Letter MUM tiles – set of 20
Bio-Glitter Set of 8 
Plain Wooden Beads – pack of 300

Heart Shaped Key Rings

Heart Shaped Keyrings craft activity on grass background

Mothers are always carrying their keys around with them, so what better reminder that they are loved than these adorable Heart Shaped Key Rings? If you are a time-poor teacher and after a quick and easy Mother’s Day craft for your students, then I highly recommend these key rings. Simply cut out cardboard in a heart shape (you can use the plastic from the key ring to help with shape and sizing) and then your students can draw and write a special Mother’s Day picture and/or message. Alternatively, how cute would a photograph of each child look inside these clear key rings?! I am positive all mothers would love a special keepsake like this.

MTA Product Used:
Heart Shaped Key ring – Pack of 10

Wooden Bead Necklaces

Wooden bead Necklaces craft activity on grass background

Making necklaces for Mother’s Day is hands down my absolute favourite crafty gift and my students always enjoy making them for their Mum/mother figure too! The reason why I think necklaces are the perfect handmade gift is because they are pretty quick and easy to make AND I love seeing how happy it makes children when they see their Mum proudly wearing their creations. Now we know that mothers are absolute angels who will pretty much wear anything their children make them… but how good would it be if they actually got beautiful necklaces that didn’t clash with most of their outfits? That’s why I love these Wooden Bead Necklaces that were made using plain wooden beads, natural beading cord and beads that were painted with pastel paints. The wooden beads are lovely and natural and the beads that have been painted with pastel paints are subtle enough to go with almost any outfit. You can even make a matching bracelet by threading the wooden beads onto a pipe cleaner and tying it around!

MTA Product Used:
Plain Wooden Beads – Pack of 300
Natural Beading Cord
Pastel Paints
Pastel Crate Craft Kit

Handmade Cards

Handmade cards craft activity on grass background

Is there anything more meaningful than a handmade card? I don’t think so! As a teacher, I know nothing beats a card that a student has made for you, which is why handmade cards are at the top of my favourite craft ideas for Mother’s Day. I love the look of these Natural Cards and Envelopes, they are a beautiful natural colour and the perfect blank canvas to get creative with! Children can use a range of craft materials to turn these cards into something special. My personal favourites are ‘If Mums were flowers, I’d pick you’ that can be paired with felt flowers, and, ‘I love you to pieces’ which involves cutting a heart shape in the front and then having lots of small felt pieces on the inside of the card. So sweet!

MTA Product Used:
Pastel Crate Craft Kit
Natural Cards and Envelopes – Pack of 20
Wooden Letter MUM Tiles – Set of 20
Felt Flowers – Pack of 100

Wooden Box Display Frames

Wooden Box Display Frames craft activity on grass background
Last but definitely not least in my favourite Mother’s Day craft ideas for kids is these adorable Wooden Box Display Frames. These frames are really cool because the contents inside the frame can be viewed from both sides through the clear plastic panels. They are perfect for displaying sweet messages, drawings and embellishments with craft materials such as felt flowers, pom poms, ‘MUM’ tiles and buttons. These display frames would also look very nice with a photograph inside them. So many options!

MTA Product Used:
Pastel Crate Craft Kit
Small Box Display Frame
Wooden Letter MUM Tiles – set of 20
Felt Flowers – Pack of 100


What is your favourite Mother’s Day craft idea for kids? We’d love to hear from you!

ABOUT HEIDI:
Heidi Overbye from Learning Through Play is a Brisbane-based, Early Years Teacher who currently teaches Prep, the first year of formal schooling in Queensland. Heidi is an advocate for play-based, hands-on learning experiences and creating stimulating and creative learning spaces. Heidi shares what happens in her classroom on her Instagram page, Learning Through Play. See @learning.through.play for a huge range of activities, play spaces and lesson