Posted on

The Robot Mouse In An Early Years Classroom

Robot Mouse Australia map activity

Introducing Digital Technologies into classrooms can be daunting for some and a pure thrill for others. Between balancing an overloaded curriculum, differentiating for a diverse range of learners and ticking off a never-ending to-do list, who has time for robotics? I get it. Well, I’m here to share how to introduce robotics into your early years classroom in ways that are meaningful, resourceful and easy to manage.

Let’s talk curriculum. The Australian Curriculum Achievement Standard for Digital Technologies in the Foundation-Year 2 band states, ‘Students design solutions to simple problems using a sequence of steps and decisions. Digging deeper, the Processes and Production Skills Content Descriptors encourage students to ‘Follow, describe and represent a sequence of steps and decisions (algorithms) needed to solve simple problems (ACTDIP004)’. These statements are an intuitive early introduction to coding and programming. But how can we make this meaningful in an everyday classroom?

Today’s learners will be solving tomorrow’s problems. We need to provide our students with the 21st century skills and capabilities they will need in order to do that. The learning experiences that students are exposed to in the early years are crucial, as they will continue to be developed over the course of their schooling. We all have to start somewhere (teachers included). Let’s take a look at how we can introduce sequencing using the Robot Mouse  available from Modern Teaching Aids.

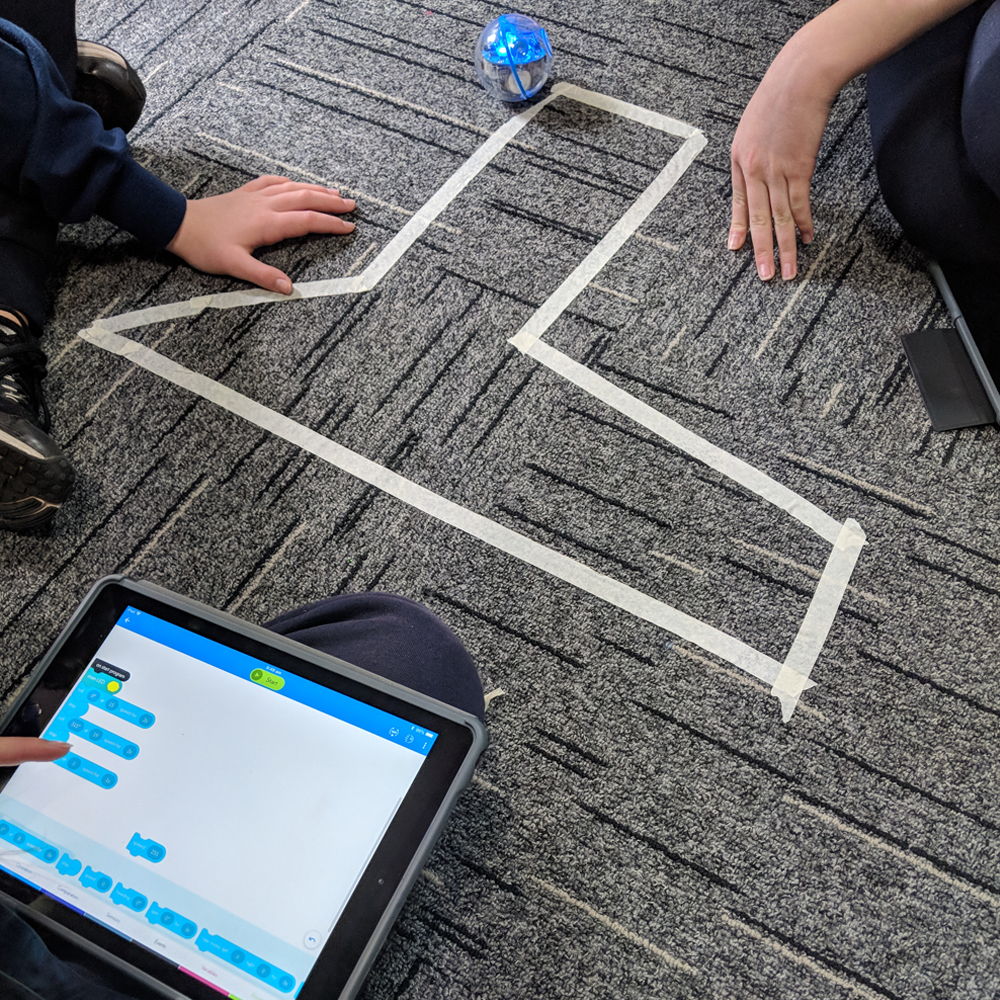
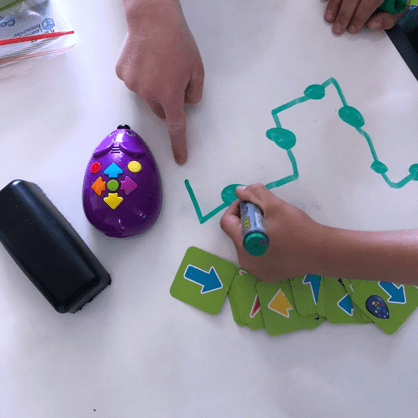
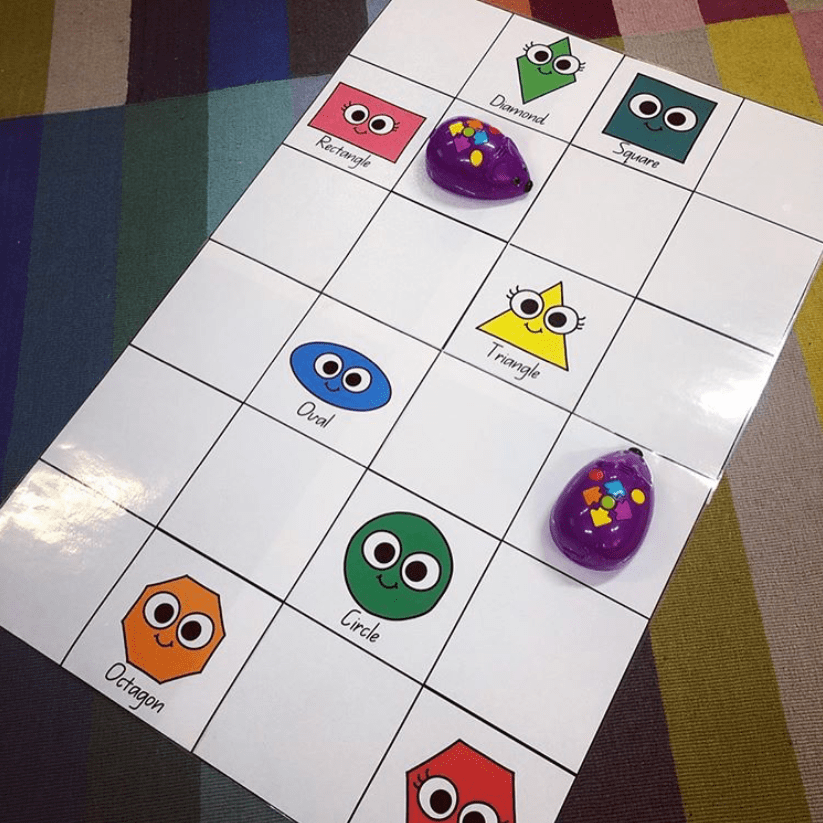
The Robot Mouse is an excellent way to introduce hands-on sequencing to increase basic coding skills, logic and navigation. The robot features movement in four directions (left, right, forwards, backwards) in two speeds and colour-coded buttons to match the accompanying coding cards. Users are required to input their sequence by pressing the buttons on top of the robot to be performed when the green circle in the middle is pressed. These robots are very user friendly for the lower years, and the cuteness factor (enhanced by the fact that the magnetic nose will ‘smooch’ another magnetic surface) will have your students hooked.

Robot Mouse hands on sequencng activity featuring child's hands

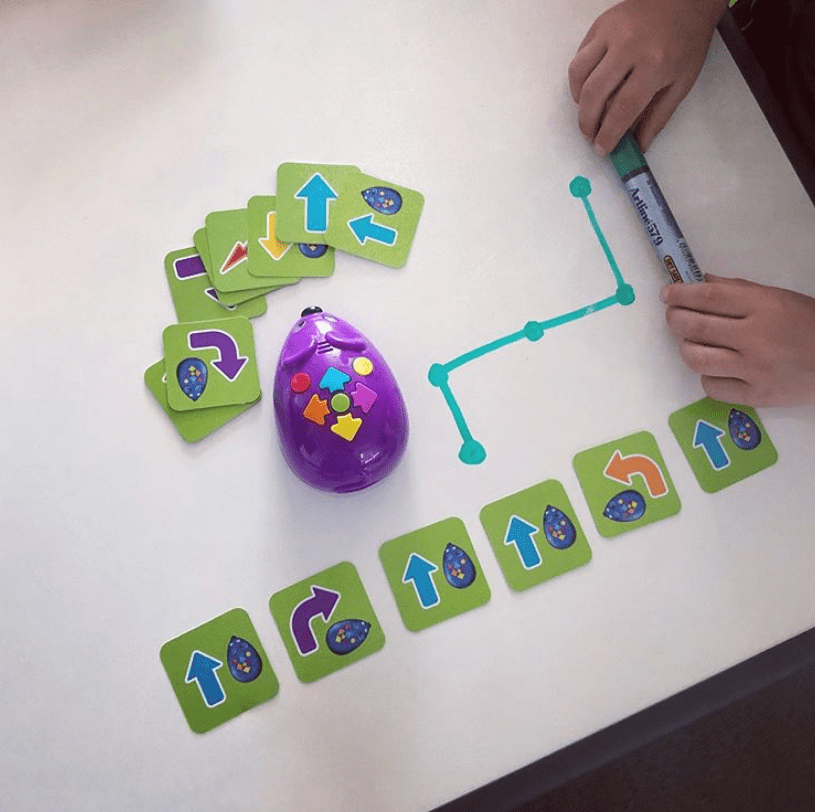
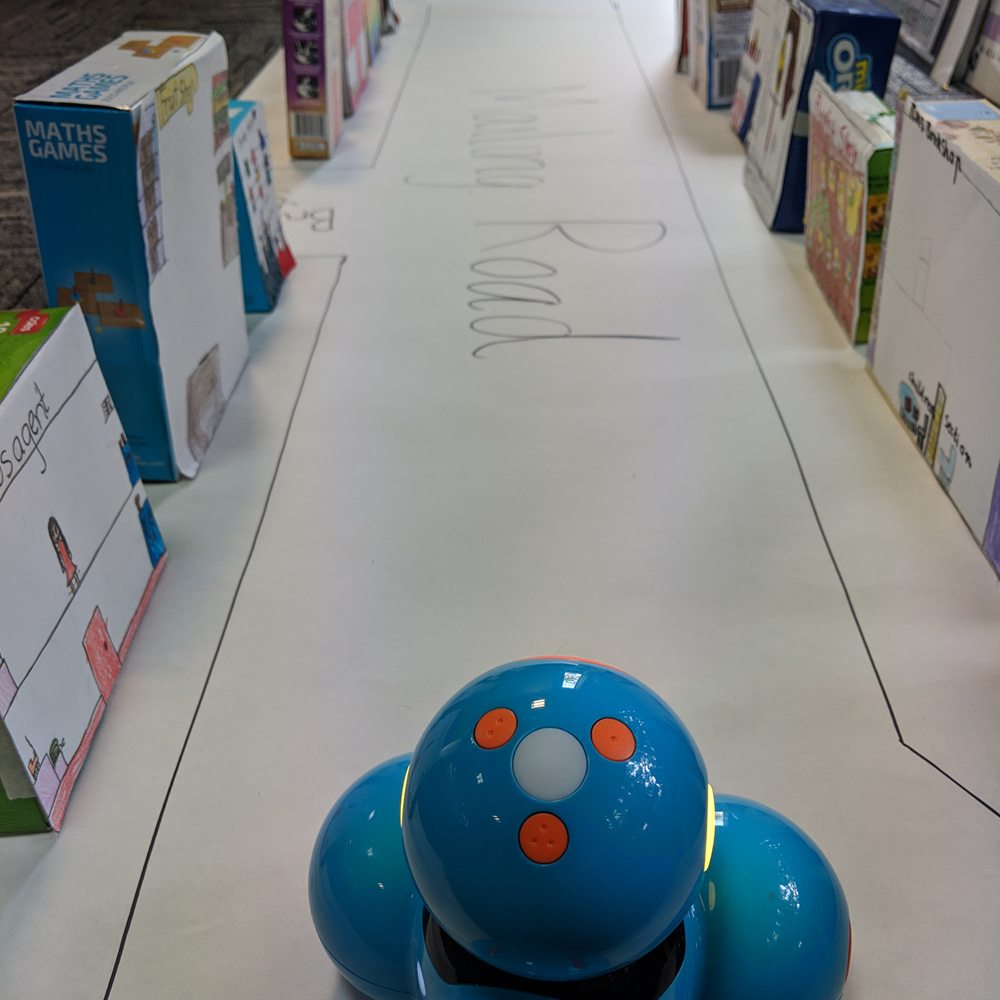
In my specialist Digital Technologies lessons, I alternate between using these robots in isolated sequencing activities and incorporating other disciplines for integrated activities. The above image displays how students can use the coding cards to design a sequence of code to achieve a purpose. In this instance, students are challenged to draw a series of lines, design a matching sequence of code and then execute it using the Robot Mouse. This activity has flexible differentiation, where students can begin with simple lines of code and then continue to extend it as their skill set increases.

The coding cards that accompany the Robot Mouse make isolated sequencing activities easy to manage. I keep the cards in small individual zippy bags, allowing the students to grab-and-go for their lessons. To begin with, lessons are very scaffolded, starting with a simple path that all students follow. After this, students of varying ability levels branch out to extend their paths and refine their logic. As students become more comfortable in their learning, they are able to design their own paths or they can attempt any pre-made ones I scatter through the classroom.

Robot mouse coding cards child's hands drawing path using whiteboard marker

Even at such a young age, you’ll find students are motivated to attempt more complex paths quite early on. A barrier that is often faced with early years students is resilience. If I had a dollar for every time I heard, “Miss Donnelly, the robot isn’t working”, I’d be a millionaire a few times over. I highly recommend having several conversations addressing that the robot IS working just fine; the problem is the student’s incorrect sequence. You can cushion this conversation with fun unplugged procedures, such as having the students verbally instruct the teacher to navigate from their chair to the classroom door. Did the students tell you to stand up? Did they tell you to move one foot and then the other? Each verbal instruction followed or missed reminds the students of the importance of thinking through the sequences and making corrections along the way. Their resilience will develop over time as they understand that the robots listen to every individual code in their sequence, even if it’s incorrect.

Let’s look at how we can bump up this activity to include concepts from other learning areas such as Mathematics. The Robot Mouse has consistent movement dimensions. This means you can create your own robot mats to suit concepts or themes you’re exploring across multiple disciplines. You can even print blank templates, laminate them and use whiteboard markers to create reusable resources to suit future uses in your classroom. It’s not about having a mat for every concept within your classroom curriculum. You can be resourceful and have these reusable mats at hand to create relevant learning experiences without printing and laminating a new mat every lesson. Click here  to download a free blank template for you to use in your classroom.

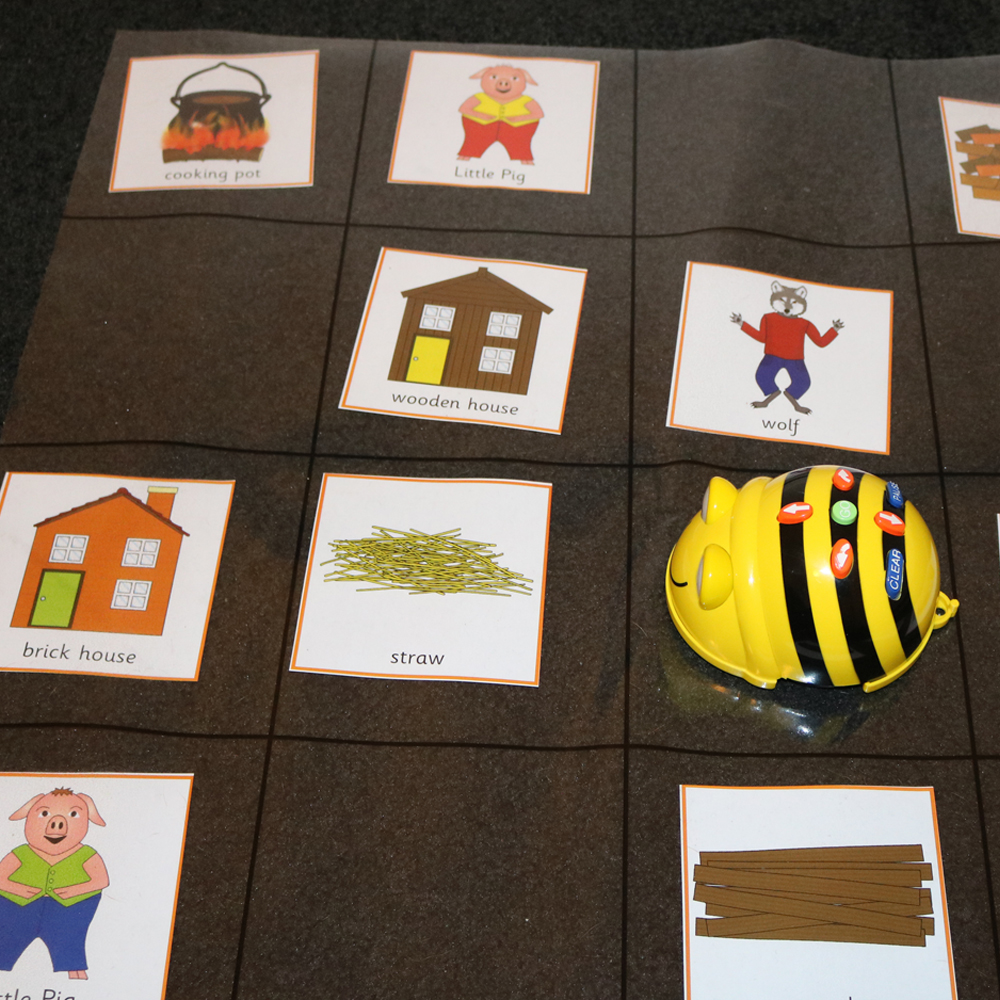
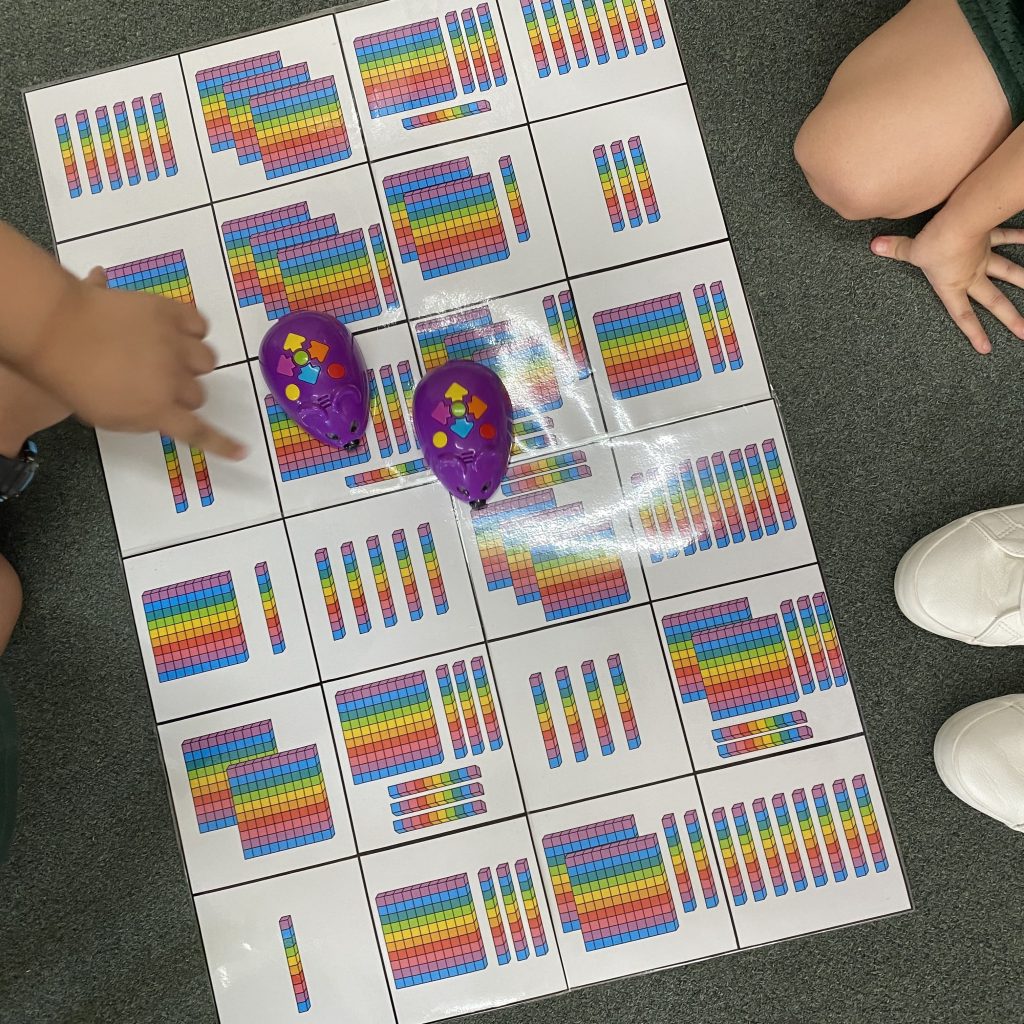
In the image below, you can see how several shapes have been added to four joined templates to create an activity where students navigate from one two-dimensional shape to another. In a Year 1 context, this activity is additionally addressing the Mathematics Achievement Standard in the areas of using ‘the language of direction to move from place to place’ and identifying two-dimensional shapes. Combining the two disciplines of Mathematics and Digital Technologies allows students to approach concepts from multiple perspectives to gain a deeper understanding of the meaning and relevance of their learning experiences.

Robot Mouse shape navigation activity mat

For this specific activity, students were challenged to navigate their Robot Mouse from one shape to another. To begin with, they were given teacher instructions in buddies eg: navigate from the triangle to the octagon. As a team, they would use the coding cards to design a physical representation of their sequence and would then input the sequence into their robot. A few repetitions of this exercise will have the students feeling comfortable enough to design their own paths for the robots.

I like to have students buddied up in these learning experiences to cross-promote sharing skills and peer support. Sharing in an early years classroom can be problematic, but commonly, when it comes to robotics and technologies in schools, sharing is vital. You can buddy up varying ability levels to allow peers to support each other in their learning. In this instance, the lower ability student has comfort in learning alongside their friend and the higher ability student is exercising the description of their understanding.


Robot Mouse MAB activity with Kids hands

Once students are comfortable with using the Robot Mouse, you will be able to easily approach cross-disciplinary concepts with the integration of robotics. Approaching concepts like addition and subtraction using MAB block and tens frames representations can refine understanding of Mathematics concepts and numeracy general capabilities. Once you have one mat set up, the ideas will flow through you! Remember, you don’t need a mat made up for every concept area – you can reuse a blank template to be resourceful.

Robot Mouse Block 10 activity with kids hands


Technology can be difficult for schools to fund and in any sense, the robotics need to be respected by all users. A few rules I have my students practise when using the Robot Mouse are:

    • Hold the Robot Mouse with two hands (one on top, one underneath.
    • Walk, don’t run! You might drop your robot or step on someone else’s.
    • Only use the Robot Mouse on the floor.
    • Do not push and pull the Robot Mouse like a toy car.
    • Turn the Robot Mouse off when finished to preserve battery life.
    • Sharing is caring.

Having rules in place for the use of robotics in the classroom will also boost student ownership of the learning experience. Students will develop a respect and appreciation for the resources they are accessing and will show a higher level of focus on the activity in front of them.


Cross-curricula links

Robot mouse map of Australia activity

When it comes to robotics, finding meaningful cross-curricula links will deepen student understanding and help to avoid an extra workload on your shoulders. Identify areas of the curriculum that align first and then work towards approaching the concept from both perspectives. Work smarter, not harder. Be strategic and resourceful with your placement of robotics in your classroom curriculum. The Robot Mouse is versatile enough to follow chalk on concrete, marker on a flat whiteboard, drawings on scrap paper and a printed and laminated colour mat. Find what works for your classroom and I challenge you to implement one activity. I’m confident you’ll find the best way that works for you, allowing you to find passion for your lessons, ease on your curriculum and engagement for your students.

Robot Mouse Smilies activity Map and chldrens hands

Featured Product: The Robot Mouse


How do you use The Robot Mouse in your classroom, we’d love to hear from you?


About the Author
Taylor is a Specialist Digital Technologies Teacher in a primary school setting. In her five years of teaching, she has found a passion for integrating a range of technologies into her classroom and strives to share these experiences with those around her. Follow Taylor along in her teaching journey on Instagram @taylorteachestech


Shop MTA>

Posted on

Creating Real World Solutions With The Micro:bit

microbit sleeve preview image

The BBC Micro:bit is a favourite Digital Technologies tool of mine that allows our students to design solutions to problems, create games, make music and respond to the surrounding environment.

The small handheld micro-controller can be coded by students using Block Code, Python, Javascript or Scratch 3.0, making it a versatile tool that can be adapted for students in primary and secondary classrooms.

The features of the Micro:bit are;

  • USB connector: Connects to a computer for power and to load programs onto the Micro:bit
  • 25 LED lights: Can be individually programmed to show shapes, text or numbers
  • 2 buttons (A and B): Programmable input buttons
  • Light sensor: The LEDs on the Micro:bit can also act as a light sensor to detect ambient light
  • Edge Connector: 25 external connectors, called Pins, on the edge of the Micro:bit allow you to connect to other input and output electronic hardware, including LEDs, motors and sensors
  • Battery socket: Power the Micro:bit using batteries
  • Reset button: Restarts the Micro:bit
  • Radio: Communicates with other Micro:bits
  • Bluetooth antenna: Wirelessly sends and receives signals to Bluetooth enabled PCs, smartphones, or tablets
  • Processor: Where the program is stored and executed
  • Compass: Detects the direction (north, south, east, west) the Micro:bit is facing
  • Accelerometer: Detects if the Micro:bit is being moved, tilted, shaken or in free-fall and at what acceleration
  • Temperature sensor: Detects the current temperature of the Micro:bit in degrees Celsius

microbit stepcounter

Introduction to the Micro:bit

The Makecode platform, developed by Microsoft, allows students to code using Block Code and Javascript. It has a great range of project tutorials for students to work through to develop their understanding of, and familiarity with, the Micro:bit.

Website: https://makecode.microbit.org/

My favourite tutorials:

Rock, Paper, Scissors
Name tag
Step counter

Step Counter

microbit stepcounter code blocks

Extension: Have students personalise and/or make enhancements to the code.

Step counter – Enhanced with a message displayed on the Micro:bit when the user reaches 1,000, 5,000 and 10,000 steps.

microbit stepcounter blocks

Once students have developed a basic understanding of how the Micro:bit works, they can be given a range of projects or challenges to solve individually or in small groups. These challenges will allow students to use their imagination and creativity to design their end product.

BOSON – Starter Kit for Micro:bit

microbit in box

Micro:bit is a simple micro-controller that can be enhanced with a range of add-on resources to allow students to achieve even more. The Boson Kit comes packed with easy-to-attach modular blocks to further empower student creativity and projects.

The Boson Kit features:

  • Micro:bit expansion board
  • Push button
  • Motion sensor
  • Rotation sensor
  • Sound sensor
  • LED light
  • Mini fan
  • LED strip
  • Mini servo

microbit fan sensor with button and childs hand
Incorporating the features of the Boson Kit into their designs allows students the opportunity to create solutions that can respond to a variety of inputs or sensors and respond or act with a desired output.

microbit sensor circuit setup

Micro:bit Pets

Students create their own Micro:bit Pet. The pet must react to different Micro:bit movements by using the LEDs and sounds to showcase the pet’s emotions. Students use art and craft materials to design and create their pet, integrating the Micro:bit to act as their pet’s face.

microbit pet green, faeturing laptop in background

microbit pet pink on classrom desk


microbit pet orange on classroom desk


microbit pet yellow with laptop in backgroundMaterials:


UN Sustainable Goals

There are a total of 17 goals that make up the UN Sustainable Goals. I focus on two or three that connect to the current learning themes taking place in our classroom when undertaking this project. This provides students with a real-life scenario to develop a solution using the Micro:bit.

UN Sustainable goals vector table

Students need to apply their content knowledge from our units of work in class, to generate ideas, code a solution and create a prototype.

Examples created by students aged 11-13 years old.

Automated Street Lights
Goal 7 – Affordable and Clean Energy
As pedestrians walk on the footpath at night, the light above sensors their presence and switches on. This provides light where it is needed, saving energy as they are not on all night long.

microbit automated street lights


Class Countdown
Goal 4 – Quality Education
This device will be installed in every classroom and every student wears a synced watch. As students enter the classroom they press button A to automatically mark the roll. If students require teacher assistance, they press button B on their watch. If the teacher wants all students’ attention on the floor, they get a countdown timer to appear on the LED screen of their watch. This was designed to save time in the classroom so teachers and students can work more efficiently.

microbit class countdown


Tree Cut Down Warning System
Goal 13 – Climate Action
Goal 15 – Life On Land
Trees in forests have sensors attached. When a tree is cut down it notifies the rangers, so they can then locate where the tree is and stop deforestation before it occurs.

microbit tree cut down warning system


Turtle to Clean the Ocean
Goal 14 – Life Below Water
The turtle swims in the ocean collecting rubbish. It was designed to appear like other animals in the ocean so as not to scare others.

microbit turtle to clean ocean


Wellbeing Watch
Goal 3 – Good Health and Wellbeing
This wellbeing watch helps fight mental health issues. When button A is pressed, either a joke, funny emoji or funny sound will play at random to cheer the person up. When button B is pressed, it notifies authorities of the location and that this person is in trouble and needs urgent attention.

microbit wellbeing watch


The Micro:bit and Boson Kit allow students to work through the design process to prototype and solve real-life problems. These resources give students the creative freedom to explore and generate ideas through hands-on learning experiences. How are you using these tools in your classroom?

Featured Product:

Boson Start Kit for Micro:Bit & MicroBit


How do you use Micro:bit in your classroom? We would love to hear from you!

About the author

Eleni Kyritsis is an award winning Year 3 teacher and Leader of Curriculum and innovation from Melbourne, Australia. Eleni facilitates professional learning workshops around the world that focus on unleashing creativity and curiosity in classrooms. You can contact her at elenikyritis.com and @misskyritsis

Shop MTA>

Posted on

Changing Role Of Digital Technology In The Classroom

Child playing a Bloxels activity on iPad

After teaching in the classroom for the past seven years, I have been fortunate and excited to have moved into the role of Leader of Curriculum & Innovation at my school. This means I no longer have my own class, and allows me the opportunity to work closely with all teachers across our school to unpack the curriculum to design, plan and implement innovative and creative learning opportunities for our students. As teachers, we need to ensure we are designing learning experiences for our students that cover a range of topics and skills to support them for their future. This is what I love.


In recent years, the addition of the Technologies strand to the Australian Curriculum has led to many teachers calling the curriculum ‘overcrowded’ and reporting that there is just ‘not enough time to teach everything’ that it encompasses. I wholeheartedly agree with these sentiments if the curriculum is taught in silos, but by taking an integrated approach across the curriculum, teachers can design learning experiences that cover several learning areas at the same time.

The Australian Curriculum states that the learning area of Technologies aims to develop the knowledge, understanding and skills to ensure that, individually and collaboratively, students:

  • investigate, design, plan, manage, create and evaluate solutions;
  • are creative, innovative and enterprising when using traditional, contemporary and emerging technologies, and understand how technologies have developed over time;
  • make informed and ethical decisions about the role, impact and use of technologies in the economy, environment and society for a sustainable future;
  • engage confidently with and responsibly select and manipulate appropriate technologies − materials, data, systems, components, tools and equipment − when designing and creating solutions;
  • critique, analyse and evaluate problems, needs or opportunities to identify and create solutions.

The Technologies learning area is then separated into two components; Design and Technologies and Digital Technologies.

Design and Technologies, in which students use design thinking and technologies to generate and produce designed solutions for authentic needs and opportunities.

Digital Technologies, in which students use computational thinking and information systems to define, design and implement digital solutions.

In this post I will share ways to integrate a variety of digital technologies across the curriculum to support you in designing engaging and meaningful learning experiences. A focus of these lesson ideas is to develop students’ communication, critical thinking, creativity and collaborative skills.

Junior Primary Ideas (Foundation – Year 2) :

Some of my favourite digital technologies to integrate in the Junior Primary classroom include, BeeBots, Dot & Dash and Cubetto. Each of these robots is very user-friendly, allowing younger learners the opportunity to be introduced to sequencing code while developing their confidence.


BeeBot 3 little pigs activity with picture cards on grid


BeeBots are small robots that can move forwards and backwards in 15cm increments and turn 90 degrees left and right. They have the ability to remember up to 40 sequences of code.

Dot and Dash are two individual robots that connect via Bluetooth to mobile devices. With a variety of Apps to control these robots, they have ability to manoeuvre around the floor in all directions, sense objects, flash LED lights and record and play back audio.

Cubetto is a wooden cube robot that moves in 15cm increments. Physical blocks are used to sequence code to manoeuvre Cubetto around a grid.


Cubetto space activity on mat


Literacy – Using story books as provocations, have students demonstrate their comprehension of the text by creating particular scenes of the story by coding any of the above robots to move around that scene.

Mathematics – Using the above technologies students develop their understanding of directional language, location and mapping skills.


Dash maths activity on grid with numbered and lettered cards

I have written numerous MTA  blog posts that explain lesson ideas for the Junior Primary classroom in further detail. Click the following links for more details lesson ideas. Many of these ideas can also be used with Cubetto too.

Australian Curriculum Links
English:
Foundation:

  • Identify some features of texts including events and characters and retell events from a text (ACELT1578)
  • Retell familiar literary texts through performance, use of illustrations and images (ACELT1580)
  • Innovate on familiar texts through play (ACELT1831)

Year 1:

  • Recreate texts imaginatively using drawing, writing, performance and digital forms of communication (ACELT1586 )

Year 2:

  • Create events and characters using different media that develop key events and characters from literary texts (ACELT1593)

Mathematics:
Foundation:

  • Describe position and movement (ACMMG010)

Year 1:

  • Give and follow directions to familiar locations (ACMMG023)

Year 2:

  • Interpret simple maps of familiar locations and identify the relative positions of key features (ACMMG044)

Digital Technologies F-2

  • Follow, describe and represent a sequence of steps and decisions (algorithms) needed to solve simple problems (ACTDIP004)


Dash activity with road drawing and boxes placed to replicate buildings


Middle Primary Ideas (Year 3 & 4):
As students’ understanding of Digital Technologies and computational thinking develops, we need to design their learning experiences accordingly. My favourite resources for these classes are Bloxels Builder and Sphero.


Child playing Bloxels activity on laptop


Bloxels Builder is a fantastic platform that allows students to be the creators of their own games. Using the free Bloxels Builder app or the physical gameboard, students use their creativity to design a character and game.


Sphero iPad activity on floor with a route made from tape

Spheros can roll at a speed of up to 7km/h in any direction, spin, flip and change colour. Using the Sphero EDU App students can accurately direct the movement of the Sphero using block code.


Bloxels
Literacy – Students create a game that represents a virtual story.

Child playing a Bloxels Literacy activity on iPad

Mathematics – Using the 13 x 13 grid, students’ creations will demonstrate their understanding of multiplication, fractions, and area/perimeter.

Bloxels maths activity on iPad with task card


Sphero
Mathematics – Students can create shapes, navigate mazes and obstacles and play games that require them to demonstrate their understanding of angles, length, time, speed.

Sphero maths activity with shaped marked on floor


Australian Curriculum Links:
English:
Year 3:

  • Create imaginative texts based on characters, settings and events from students’ own and other cultures using visual features, for example perspective, distance and angle (ACELT1601)

Year 4:

  • Create literary texts that explore students’ own experiences and imagining (ACELT1607)

Mathematics:
Year 3:

  • Create and interpret simple grid maps to show position and pathways (ACMMG065)

Year 4:

  • Use simple scales, legends and directions to interpret information contained in basic maps (ACMMG090)
  • Compare angles and classify them as equal to, greater than, or less than, a right angle (ACMMG089)
  • Recall multiplication facts up to 10 × 10 and related division facts (ACMNA075)
  • Compare objects using familiar metric units of area and volume (ACMMG290)

Digital Technologies 3-4:

  • Define simple problems, and describe and follow a sequence of steps and decisions (algorithms) needed to solve them (ACTDIP010)
  • Implement simple digital solutions as visual programs with algorithms involving branching (decisions) and user input (ACTDIP011)

Upper Primary Ideas (Year 5 & 6):
Upper Primary years students have the ability to apply their learnt skills and knowledge of digital technologies to create solutions to problems. My favourite resources for Upper Primary years are the Micro:bit and SamLabs.

The Micro:bit is a small microcontroller with LED lights, sensors, accelerometer and compass.

Microbit activity using light sensors and pom poms on shoes

SamLabs are wireless blocks and accessories that connect together including motors, sliders, buttons, lights and sensors.

Sam Labs activity using light sensors and pom poms on cups

Lesson idea – Using the United Nations Sustainable Goals as a guide, I select two or three goals that link to our unit of inquiry. Students are asked to focus on one of these goals and to create a solution to this problem using either the Micro:bit or SamLabs technologies.

Sam Labs classroom activity with trees ad grass made from natural materialsChild creating Sam Labs sustainability house with solar panels and garden made out of card

I explore this in more detail (with student examples) in my MTA Blog:  Integrating Sam Labs in the Classroom 

Digital tech16

Australian Curriculum Links:

Digital Technologies 5-6:

  • Define problems in terms of data and functional requirements drawing on previously solved problems (ACTDIP017)
  • Design, modify and follow simple algorithms involving sequences of steps, branching, and iteration (repetition) (ACTDIP019)
  • Implement digital solutions as simple visual programs involving branching, iteration (repetition), and user input (ACTDIP020)
  • Explain how student solutions and existing information systems are sustainable and meet current and future local community needs (ACTDIP021)

Science:
Year 5:

  • Scientific knowledge is used to solve problems and inform personal and community decisions (ACSHE083)

Year 6:

  • Electrical energy can be transferred and transformed in electrical circuits and can be generated from a range of sources (ACSSU097)
  • Scientific knowledge is used to solve problems and inform personal and community decisions (ACSHE100)

Whether it be the digital technologies I have highlighted, or any other, technology in our classrooms they should not be seen as something separate, but rather something that is integrated purposefully into student learning experiences. These technologies provide hands-on learning opportunities that allow for students to develop critical thinking, creativity and problem solving.

Featured Products:

Dash & Dot Educational Robots Pack 

BeeBots

Cubetto

Bloxels

Sam Labs Classroom Kit

Micro:bit Starter Kit

Sphero SPRK+

Sphero Bolt


How are you using Digital Technologies across the curriculum? We would love to hear from you!

About the Author

Eleni Kyritsis is an award winning teacher from Melbourne. She is the Leader of Curriculum and Innovation at Strathcona Baptist Girls Grammar. Eleni facilitates professional learning workshops around the world that focus on unleashing creativity and curiosity in classrooms. You can contact her at elenikyritis.com and @misskyritsis