Posted on

Deck the halls: 9 Christmas craft activities that bring the festive!

Christmas

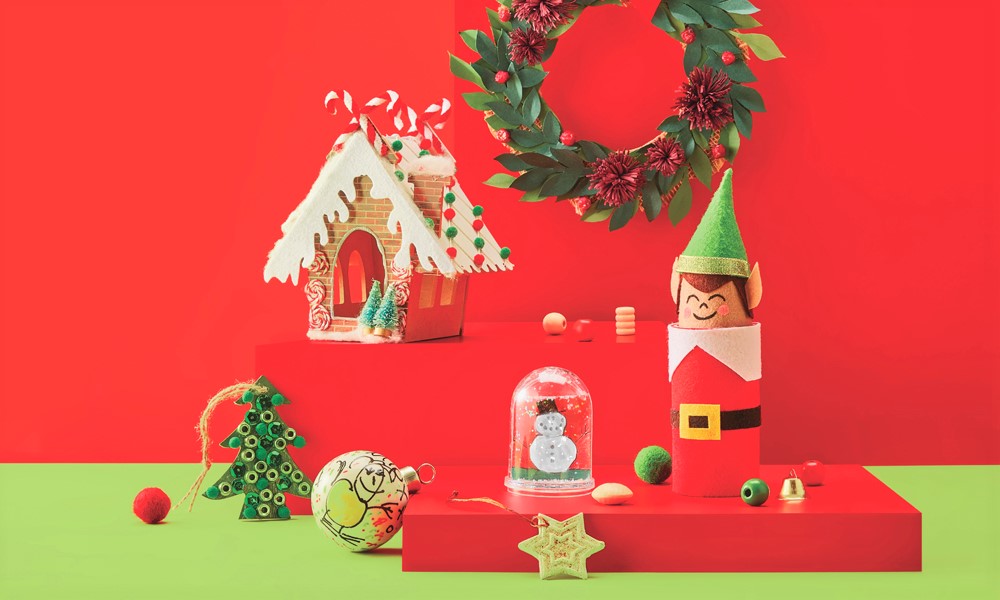
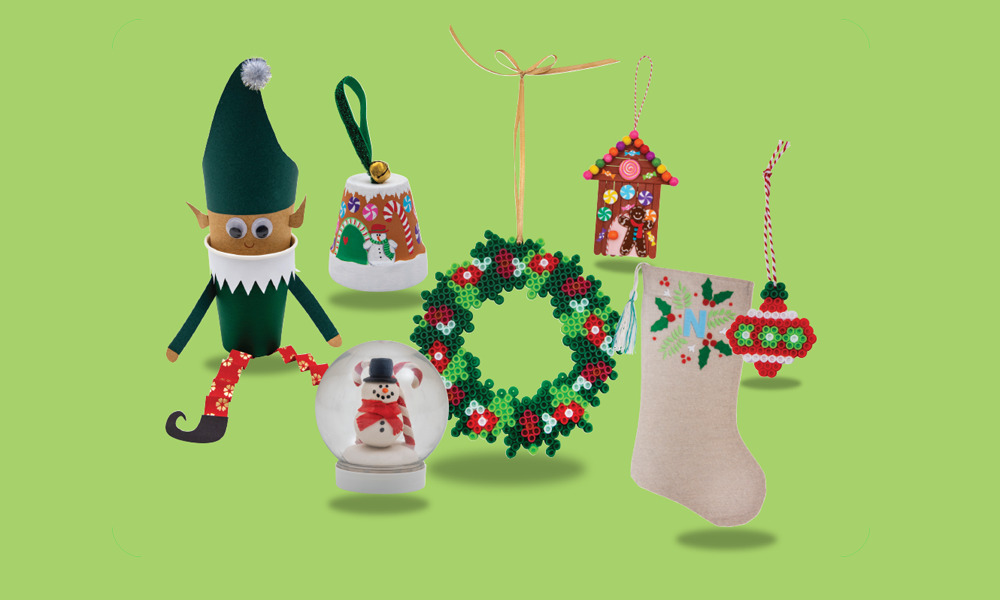
From wreaths to snow globes, it’s time to get Christmas crafty with these 9 elf-approved activities! While Santa is busy in the North Pole preparing for his big appearance, that’s the cue for all of us down here to plan our festive season arts and crafts. We’ve put our Santa thinking caps on and come up with 9 fun craft activities to bring the joy and merry! They’re as easy to make as kicking back on a sleigh ride with jingle bells on! Little creative minds and hands ready? Let’s gooo!
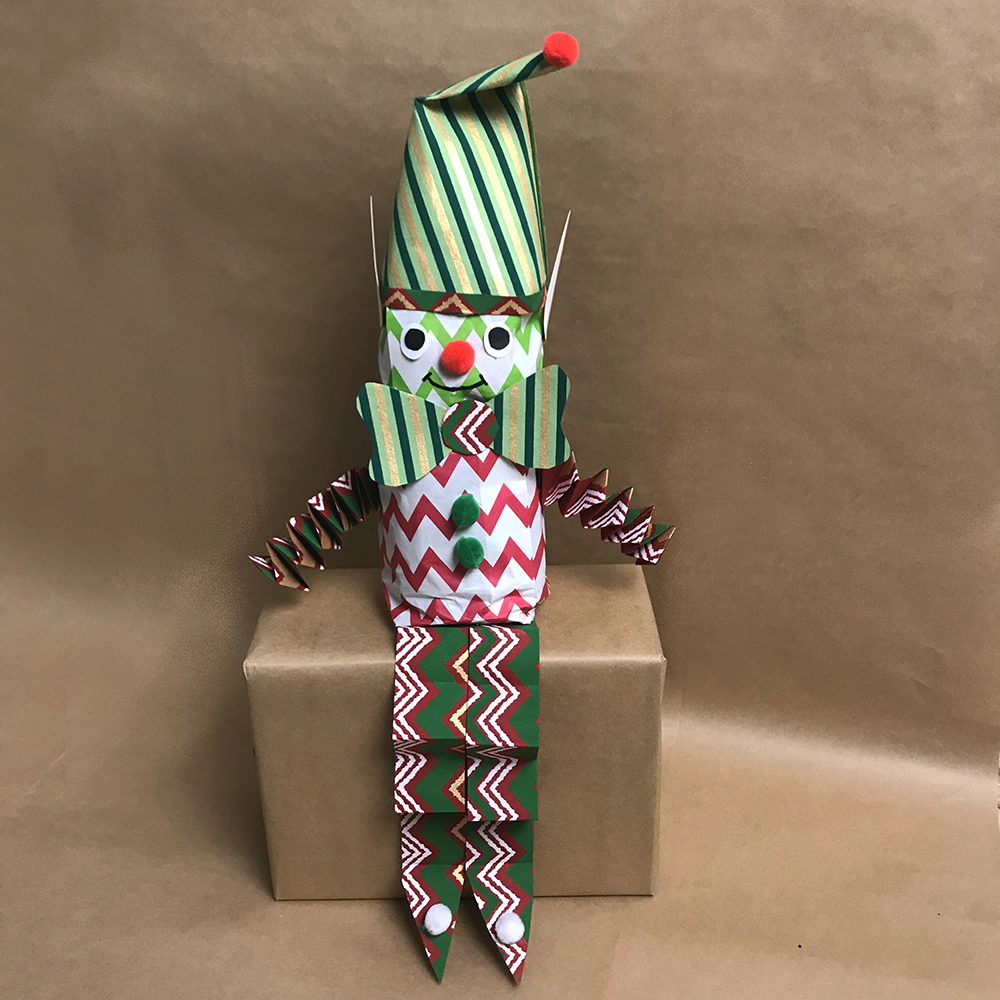
 

Elf cup

Christmas Craft Elf Cup

We took a poll and 100% of Santa’s elves LOVE it when you create little craft versions of them! These finished elf cups look wonderful sitting on a shelf (naturally), on the Christmas table or near the tree. White eco-paper cups are the basis of these cute decorations, painted in green. Then you build your elf’s legs, feet, and cheeky head and hat.


You will need:

White Eco Paper Cups https://www.teaching.com.au/product/jm850

Christmas Paper Chains https://www.teaching.com.au/product/cs5548

A4 Coloured Cover Paper https://www.teaching.com.au/product/teb0001

18mm Joggle Eyes https://www.teaching.com.au/product/sh1038

Strong Craft Glue https://www.teaching.com.au/product/cs0004

A4 Kraft Paper https://www.teaching.com.au/product/teb0087

Assorted Christmas Pom Poms https://www.teaching.com.au/product/th180


Let’s make it!

Cover your cup in green using a marker or paint and set aside to dry.

To make the elf’s collar, cut a strip of white cover paper 28(L) x 3.5(W)cm, and then trim zig-zags into one edge (triangles measuring approx. 1.5cm, with each point roughly 1.5cm apart).

Wrap your zig-zag collar around the top of the cup, attaching with glue at the back.

To make the elf’s legs, take 2 strips of Christmas paper chain and fold them back and forth to make a zig-zag fold.

Use a dab of glue to attach the legs to the base of the cup.

To make the feet, fold a piece of black cover paper in half and draw one point elf shoe with a pencil, cut the pencil markings out, giving you two shoes.

Use a dab of glue to attach the shoes to the very end of the zig-zag paper legs.

To make the elf’s head, cut a piece of brown Kraft paper approx. 15(L) x 26(W)cm, wrap it into a cylinder with an overlap of approx. 2cm, and either tape or glue in place. Pop it into the cup.

To make the hat, free draw a wonky triangle shape (measuring approx. 26cm at the base, going up to a point. Our elf’s hat measures 14cm from the base line to the point).

Cut out your elf hat and glue it onto the top of the elf hat, overlapping the hat onto the Kraft paper.

To make the arms, use the excess paper from the hat and Kraft paper. Cut two strips of brown craft paper measuring 9(L) x 1.5(W), and 4 x coloured paper lengths 8(L) x 1.5cm.

Layer the Kraft paper and coloured paper together – 1 coloured on the bottom, Kraft in the middle with the ends poking out and another coloured on the top, gluing together. Repeat to make the second arm. Use a pair of scissors to round off the brown Kraft paper to form the hands.

Make a small 45-degree fold on the tops of the arms and glue to the elf cup body.

Free draw two ears on the brown Kraft paper – with 0.5cm excess to fold back and glue to the elf’s head.

Finish off by adding a smile and gluing on 2 joggle eyes, a pom pom on the hat and set aside to dry thoroughly.

Done! The perfect Elf Cup is ready!


TIP: Modify for younger age groups with pre-cut shapes or templates to snip out.


Felt initial decorated stocking

Christmas Craft Felt Initial Stocking

Hanging a Christmas stocking is part of the magic of the season. Making your own initialled one, or one for a family member, makes it even more special. The beauty of this craft activity is it gives you a beautiful item to cherish that is as functional as it is decorative.


You will need:

Cotton Stockings https://www.teaching.com.au/product/sh9642

Christmas Felt https://www.teaching.com.au/product/CS5193

Pastel Felt https://www.teaching.com.au/product/CS5162

Embroidery Thread https://www.teaching.com.au/product/cs680

Assorted Acrylic Yarn https://www.teaching.com.au/product/TH060

Supertac Glue 550ml https://www.teaching.com.au/product/th005


Let’s make it!

Draw the first letter of your name onto a small piece of paper in a thick font.

Lay the paper onto a small piece of pastel felt, and carefully cut the paper along the line cutting the felt at the same time.

Using the same paper stencil method, snip out the shapes of holly leaves, berries, and any other Christmas-themed decorations as desired.

Place a piece of paper inside the stocking, to prevent the back and front from sticking to each other while using glue.

Lay your design pieces onto the cotton stocking and when you’re happy with their placement, use strong Supertac fabric glue to adhere them in place. Set aside to thoroughly dry.

To make the tassel, cut a piece of thick cardboard to 10(L) x 12(H)cm.

Take your chosen colour of yarn & embroidery threads and wrap it around the longest length of the card right down the middle (you can secure the end with a piece of sticky tape to help start you off).

Continue wrapping around 15 times.

Take 3 strands of yarn roughly 30cm long and tie them together with a knot on one end. Tape them to the table to hold in place and plait the three lengths together until you reach the end. Tie off with a knot.

Take your plaited yarn, and gently bring the ends across the width of the card, bringing the thread underneath the wrapped thread at the top of the card and tie a firm double knot.

Cut the threaded yarn at the bottom, freeing it from the cardboard.

Take 3 more strands of thread measuring 30cm and wrap these around the bundle of tassel thread approx. 2cm from the top of the tassel. Tie off with a firm double knot, letting the ends fall to become part of the tassel. Trim if needed.

Tie the plaited lengths at the top of the tassel to the stocking’s hanging loop, just inside the top of the stocking, letting your tassel hang down the side.

Done! The perfect Christmas Stocking is ready.


TIP: Younger age groups might enjoy gluing pre-cut shapes & embellishments to their stockings including Christmas Holly, Pom Poms, Buttons and Glitter Glue.

Christmas Holly https://www.teaching.com.au/product/SH786

Pom Poms https://www.teaching.com.au/product/CS5194#

Buttons https://www.teaching.com.au/product/cs1003

Glue Glitter https://www.teaching.com.au/product/cs6120


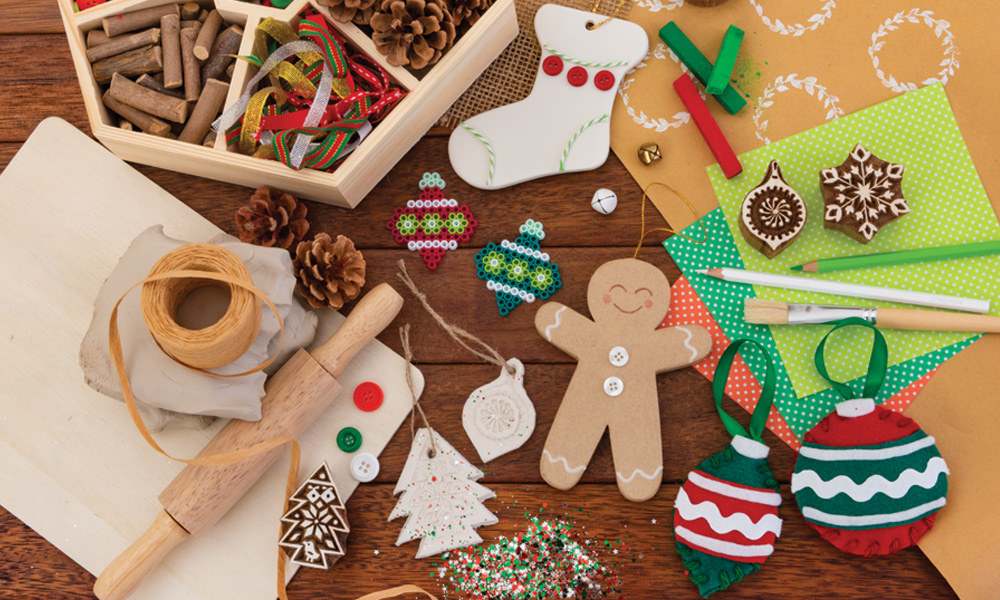
Gingerbread house terracotta pot ornament

Christmas Craft Terracotta Pot Ornament

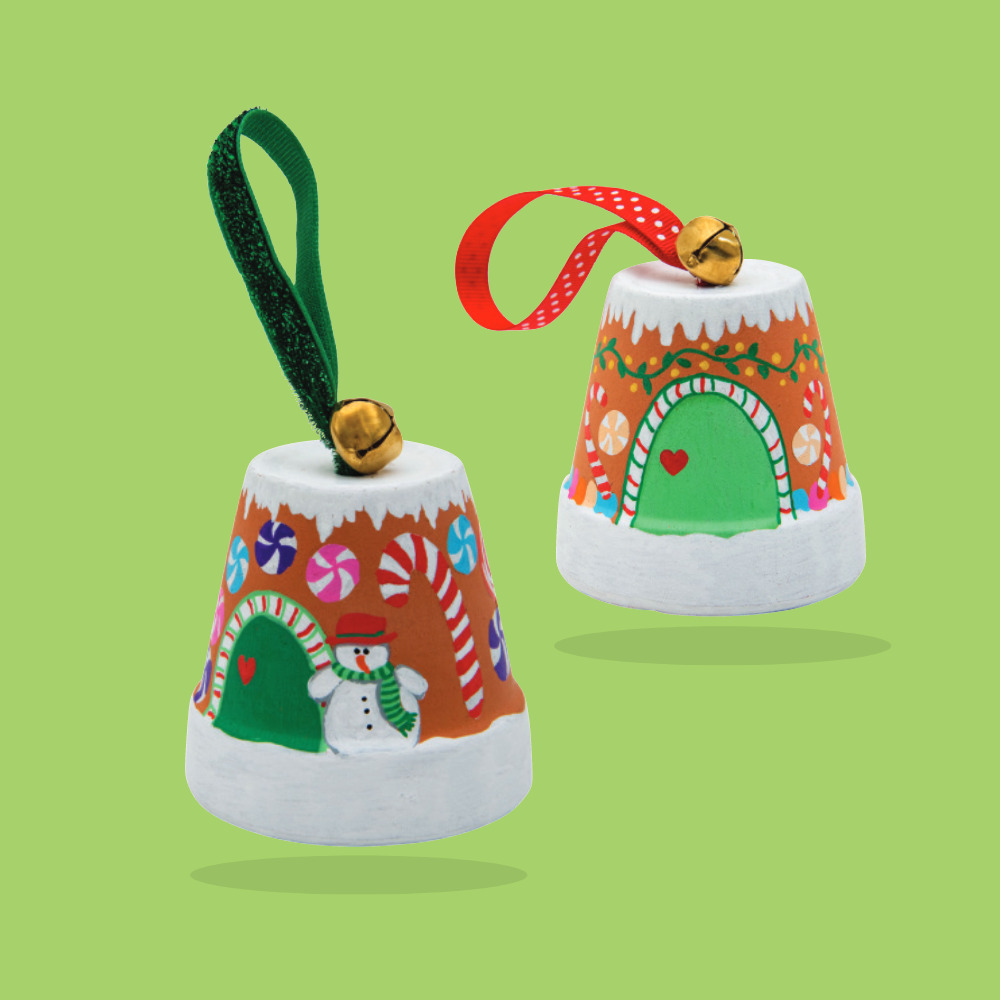
This gingerbread house ornament is so cute, it’s bound to be a big favourite for little hands to create and give them a tremendous sense of pride in their work! It would look great sitting on a desk, a shelf, coffee table or a windowsill! These little terracotta pot ornaments also make perfect seasonal gifts for loved ones!

You will need:

Terracotta Plant Pots https://www.teaching.com.au/product/sh9802

Fine POSCA Markers https://www.teaching.com.au/product/um303

Christmas Jingle Bells https://www.teaching.com.au/product/sh9475

Assorted Christmas Ribbons https://www.teaching.com.au/product/sh1588

Crystal Clear https://www.teaching.com.au/product/md025


Let’s make it!

Lightly draw your design onto the terracotta pot with a lead pencil – white snow around the rim and fallen snow coming down around the top edges, a little door, candy canes, gum drops, lollies etc. as desired.

Use the white POSCA paint marker to fill in the large white snow areas.

Use the colourful POSCA paint markers to fill in the brightly coloured details, letting your pencil markings guide your art and set aside to dry.

Apply a layer of Crystal Clear to the entire surface of the pot to provide a permanent barrier to moisture and wear & tear and set aside to dry.

Cut a 20cm length of Christmas Ribbon, form a loop and push the two loose ends through the Jingle Bell.

Feed both loose ends through the hole at the top of the pot, trapping the Jingle Bell on top.

Use strong tape or glue to adhere the loose ribbon ends to the inside of the pot.

Done! The perfect Gingerbread House Terracotta Pot Ornament is ready.


TIP: Further personalise your decoration with embellishments, glitter or writing as desired.


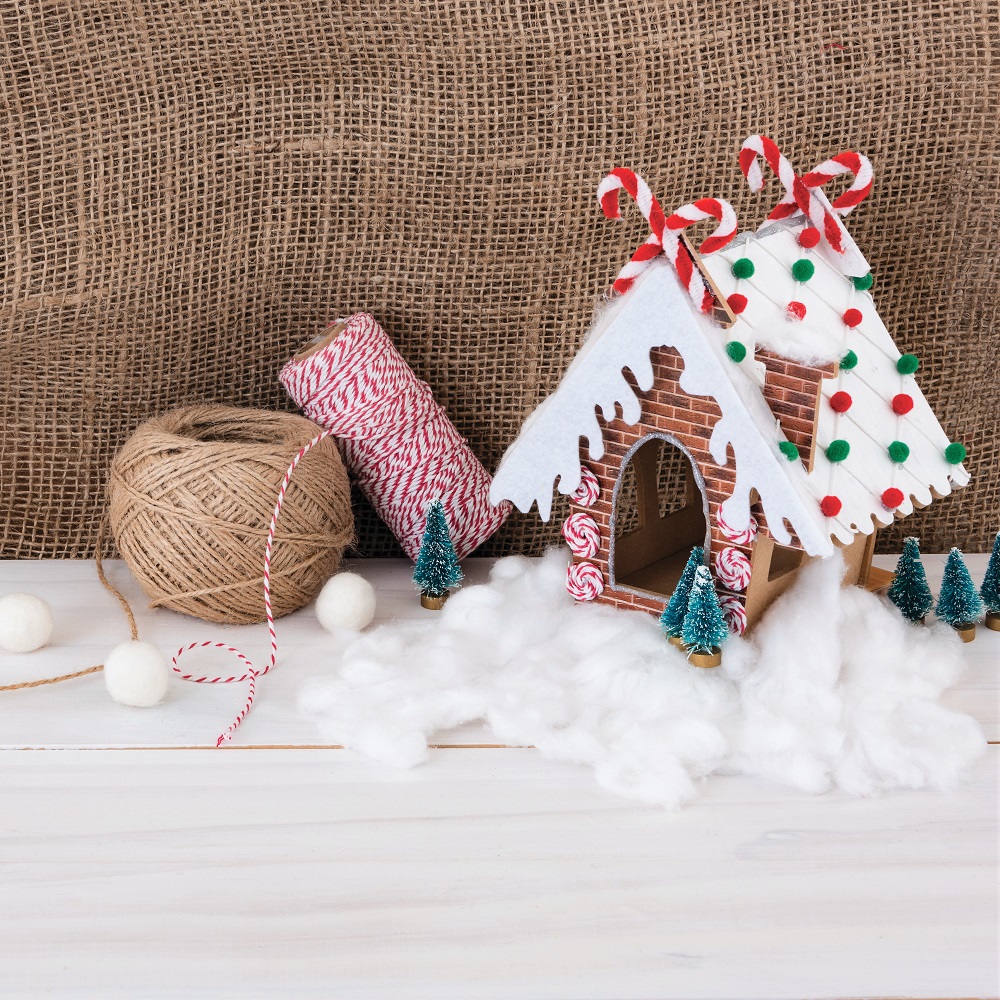
Gingerbread pop stick houses

Christmas Craft Gingerbread Pop Stick House
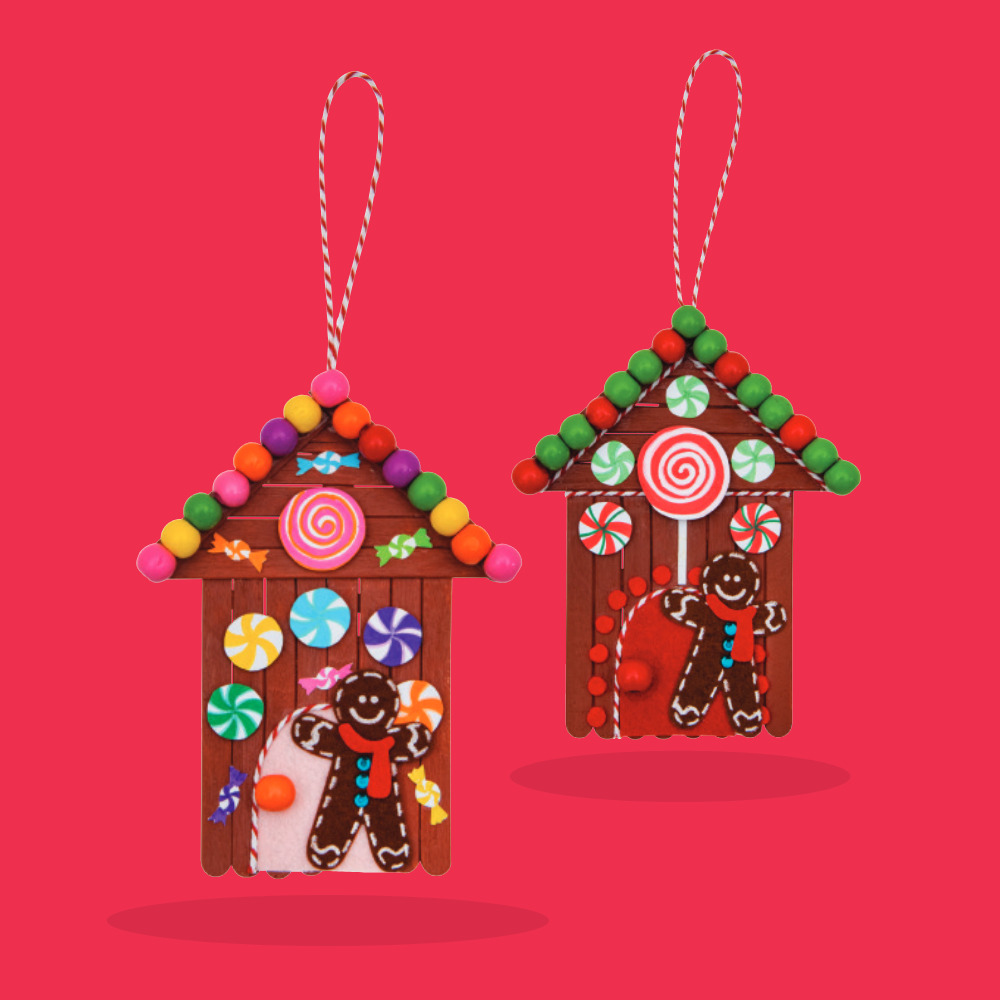
No holiday season is complete without a gingerbread house – the sort you can eat and the sort you can treasure, like these! Whimsical and looking oh-so-delicious, these quaint pop stick houses make beautiful seasonal displays. They’re so pretty to hang around the classroom, on the Christmas tree at home or to gift as thoughtful presents!


You will need:

Paddle Pop Sticks Plain https://www.teaching.com.au/product/jm67

Choc Fudge Brown Classroom Splash Acrylic Paint https://www.teaching.com.au/product/ec1114

Strong Craft Glue https://www.teaching.com.au/product/cs0004

Wooden Coloured Beads https://www.teaching.com.au/product/am1770

Assorted Felt Sheets https://www.teaching.com.au/product/flt016

A4 White Cardboard https://www.teaching.com.au/product/AUS208

Christmas Candy Colour Chenille Sticks https://www.teaching.com.au/product/sh1321

Fine POSCA Marker https://www.teaching.com.au/product/UM303

Assorted Felt Christmas Stickers https://www.teaching.com.au/product/SH1613

Red and White Bakers Twine https://www.teaching.com.au/product/sh733


Let’s make it!

To assemble the pop stick house – trim 9 pop sticks to 2/3 of their original size.

Lay 8 of the trimmed pop sticks in a row and use strong glue to adhere the 9th trimmed pop stick across the bottom (to hold your 8 pop sticks together). Allow to dry.

When your glue is dry, flip over and glue 1 whole-length pop stick to the top of the trimmed pop sticks, covering the trimmings.

Trim 2 more pop sticks to 2/3 of their size and glue these to form a triangle-shaped roof (one end each on the sides, and the other end together to form the roof’s point).

When the glue is dry, trim 4 more pop sticks to fit the roof’s triangular frame, and glue in place. Allow to dry.

When the glue is dry, flip your Gingerbread House over – it’s now ready to paint the front in your desired shade of fudge brown. Set aside to dry.

Now it’s time to make all your decorations. We’ve used coloured wooden beads to decorate the roof and doorknob, felt sheets to make the door, bakers’ twine to trim, Christmas felt stickers and candy colour chenille sticks. The sweet treats have been made using POSCA markers on white cardboard which have been cut out and glued into scraps of white felt to raise them up.

Use strong glue to attach all your decorations to the front of your Gingerbread House and set aside to dry thoroughly (the wooden doorknob might need a 2nd blob of strong glue to hold in place).

Lastly, flip your Gingerbread House over, cut a length of baker’s twine and attach to the back of the house to form a hanging loop) and set aside to dry.

Done! The perfect Gingerbread House Decoration is ready.


TIP: Older age groups might enjoy using glue guns to assemble their houses and decorations.


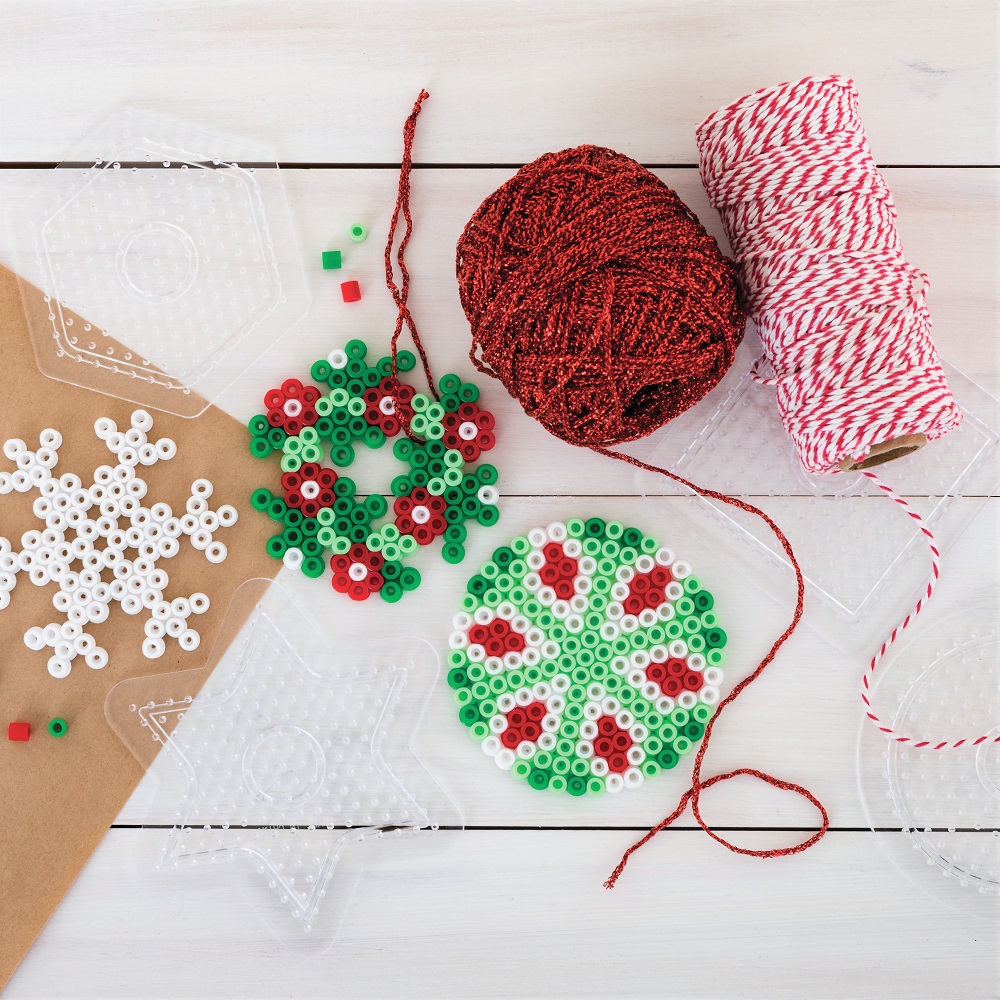
Iron-on beads tree baubles and Christmas wreath

Christmas Craft Christmas Wreath

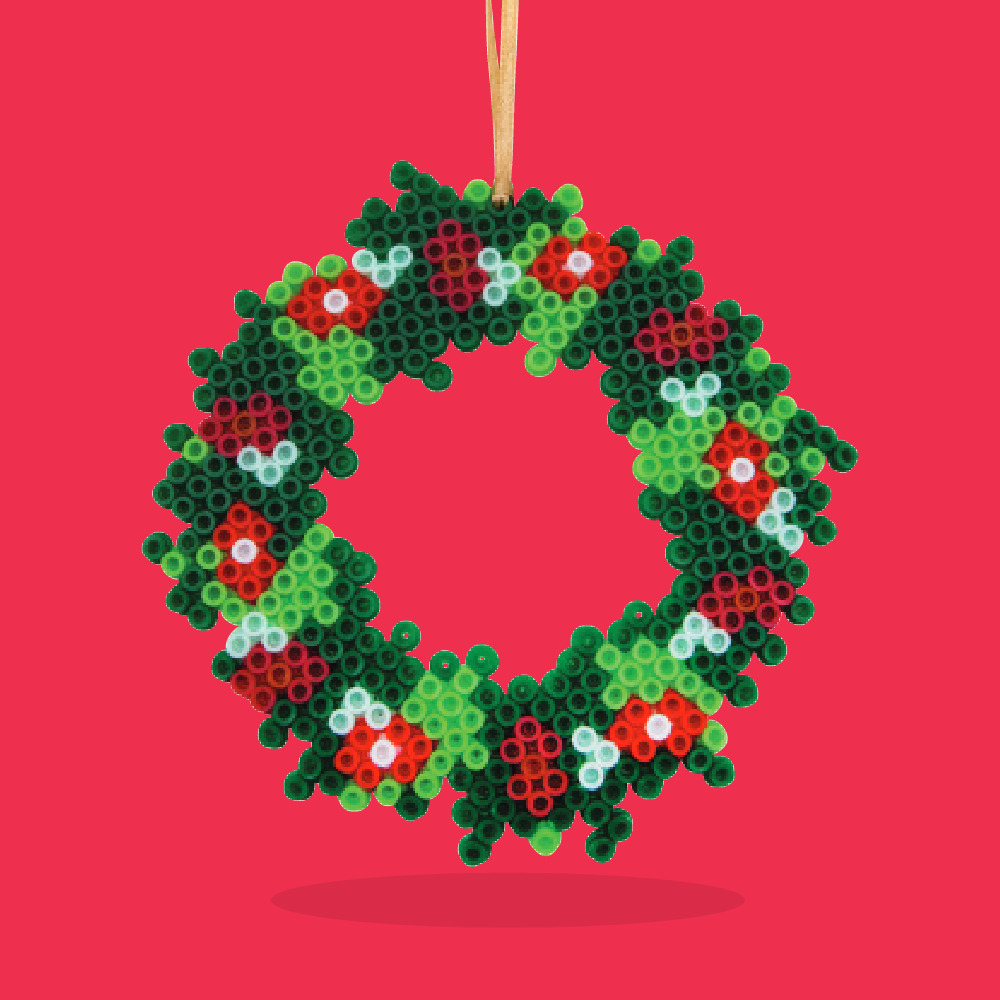
Have you tried making iron-on bead ornaments? It’s a really simple and fun creative activity, allowing for all sorts of patterns and shapes. You arrange the Christmas-coloured beads on the peg boards to make your desired pattern. You’re then ready to fuse the beads together using a hot iron (adult time!) to make a long-lasting ornament to adorn classrooms, homes or the beloved family Christmas tree.

Baubles – you will need:

Christmas Iron-on Beads Kit https://www.teaching.com.au/product/pb2456k

Red and White Bakers Twine https://www.teaching.com.au/product/sh733 OR

Christmas Ribbon Rolls https://www.teaching.com.au/product/cs9207

Wreath – you will need:

Christmas Iron-on Beads https://www.teaching.com.au/product/pb2456

Square Bead Boards for 5mm Beads https://www.teaching.com.au/product/amb600

Ironing Paper for Iron-on Beads https://www.teaching.com.au/product/amb800

Christmas Ribbon Rolls https://www.teaching.com.au/product/cs9207


Let’s make them!

Arrange the iron-on beads into a design on the bead board.

Warm a household iron to high, making sure the steam is off.

Cover the design with a sheet of ironing paper and iron over until the beads start to melt and fuse together into a colourful and flexible shape.

Allow your design to cool before removing from the bead board.

Peel the protective layer off an acetate sheet and cut two pieces to the size of your frame.

When cool, thread a length of yarn through one of the beads, creating a loop to hand, and tie off (a skewer will help to remake a hole if the beads have completely melted.

Done! The perfect Iron-on Beads Christmas decoration is ready.


TIP: Make sure you have an adult to help or complete the ironing steps.


Snow globe

Christmas Craft Snow Globe

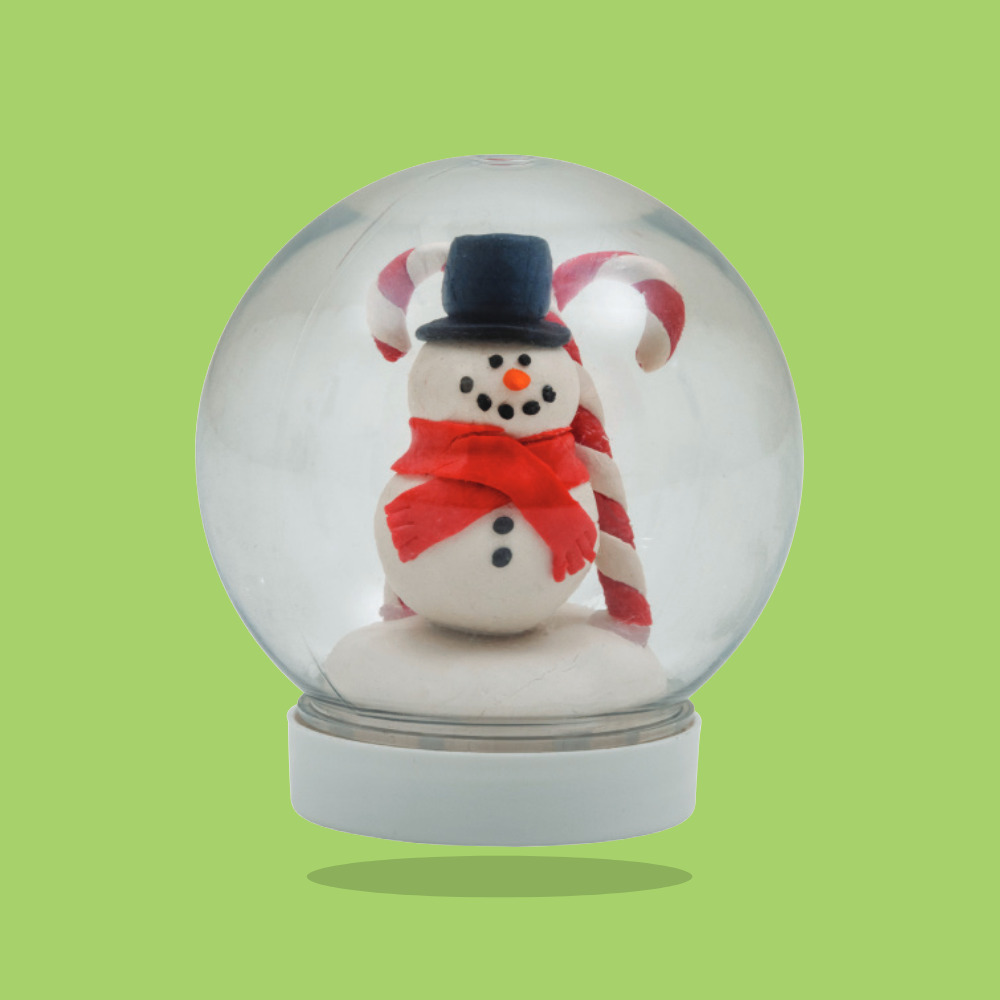
Do you collect snow globes? Do you have one special one? Have you made one before? A snow globe makes a perfect lasting seasonal treasure for little ones – or a perfect gift for friends or family members. You can make whatever scene you like for the inside of your snow globe, although we went with a snowman! However, you can let your creativity run wild with your perfectly preserved snow globe creation!


You will need:

Snow Globe https://www.teaching.com.au/product/CS6575

Oven Bake Polymer Clay https://www.teaching.com.au/product/KC1025

Glitter Shakers Tubes https://www.teaching.com.au/product/CS2400

High Temp Glue Gun https://www.teaching.com.au/product/CS1660

High Temp Glue Sticks https://www.teaching.com.au/product/CS1661

Christmas Rhinestones https://www.teaching.com.au/product/SH9727

Christmas Ribbon Rolls https://www.teaching.com.au/product/CS9207


Let’s make it!

Wash your hands with soap and water, and dry thoroughly before using the clay.

Soften the Polymer clay using the warmth of your hands, kneading until it is warm and workable.

Shape the clay into a Christmas scene (a snowman, candy canes, reindeer, Santa, presents, a tree etc). Make sure it’s able to fit inside the snow globe (we’ve made a snowman, 2 candy canes and a platform).

Carefully lay your designs onto a flat baking tray with baking paper.

Put your finished design into the oven and bake at around 130 degrees Celsius for 15 to 30 minutes (baking times may vary depending on the size of your chosen designs).

Let your creation completely cool before handling (any rough areas can be sanded or touched up with paint as desired).

Using a hot glue gun (or strong glue that will be waterproof when dry), adhere your Christmas creations to the inside of the snow globe lid, and set aside to dry.

Fill the snow globe with water and glitter as desired and tightly screw the lid to the globe (securing the lid to the globe with a hot glue gun will add complete security).

Decorate the base of the snow globe with sequins or ribbon as desired.

Done! The perfect Christmas Snow Globe is ready.


TIP: Make sure to have an adult help or complete the steps requiring an oven.


Pop stick nutcracker ornament

Christmas Craft Pop Stick Nutcracker

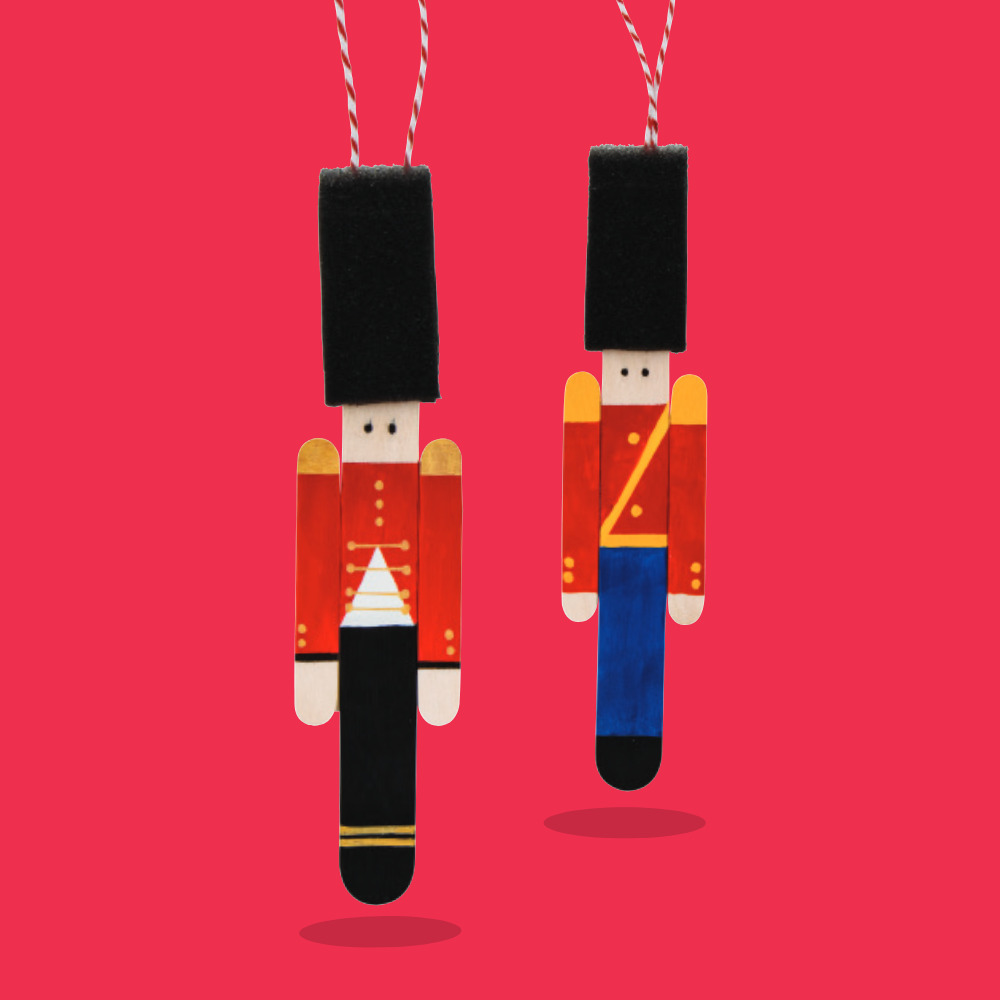
This is such a simple but adorable ornament to hang on the Christmas tree! Do you know the story of the Nutcracker? It tells the story of a little girl called Marie (Clara in some versions) and her toys. In the original story, Marie’s toys come to life on Christmas Eve and a Nutcracker figure helps lead the fight against an army of mice! One of the main themes is about the power of imagination. Marie leads people through a magical dream, who see the wonder of Christmas through her eyes.


You will need:

Foam Paint Brush Set https://www.teaching.com.au/product/nar102

Jumbo Pop Sticks https://www.teaching.com.au/product/jm100

Mini Paddle Pop Sticks https://www.teaching.com.au/product/sh956

Fine Art Student Acrylic, https://www.teaching.com.au/product/ats08

Fine POSCA Markers https://www.teaching.com.au/product/UM303

Gold Bullet POSCA Marker https://www.teaching.com.au/product/UM509

Strong Craft Glue https://www.teaching.com.au/product/cs0004

Red and White Bakers Twine https://www.teaching.com.au/product/sh733


Let’s make it!

Use a lead pencil to lightly mark out the Nutcracker’s details on 1 x jumbo pop stick (the face, jacket, pants and shoes) and 2 x mini pop sticks (the arms and hands).

Use acyclic paint to block out the colours (washi tape can help create crisp lines) and set aside to dry.  Washi Tape: https://www.teaching.com.au/product/th1625

Use fine POSCA paint pens to decorate the details – yellow for the uniform’s buttons, black to make the eyes etc. and set aside to dry.

Lay the pop sticks face down, arrange them into place and use strong tape or glue to hold them in place, and set aside to dry.

Remove the handle from the foam paint brush, add a small squeeze of strong glue inside, and slide it onto the Nutcracker’s head.

Attach a loop of baker’s twine to the back of the ornament with strong glue (we’ve poked the ends into the back of the sponge hat) and set aside to dry.

Done! The perfect Pop Stick Nutcracker Ornament is ready.


TIP: A small pop stick cut in half and running along the back of the Nutcracker will help the body and arm pop stick pieces stay in place.


Paper Jingle Ornaments

Christmas Craft Paper Jingle Ornament

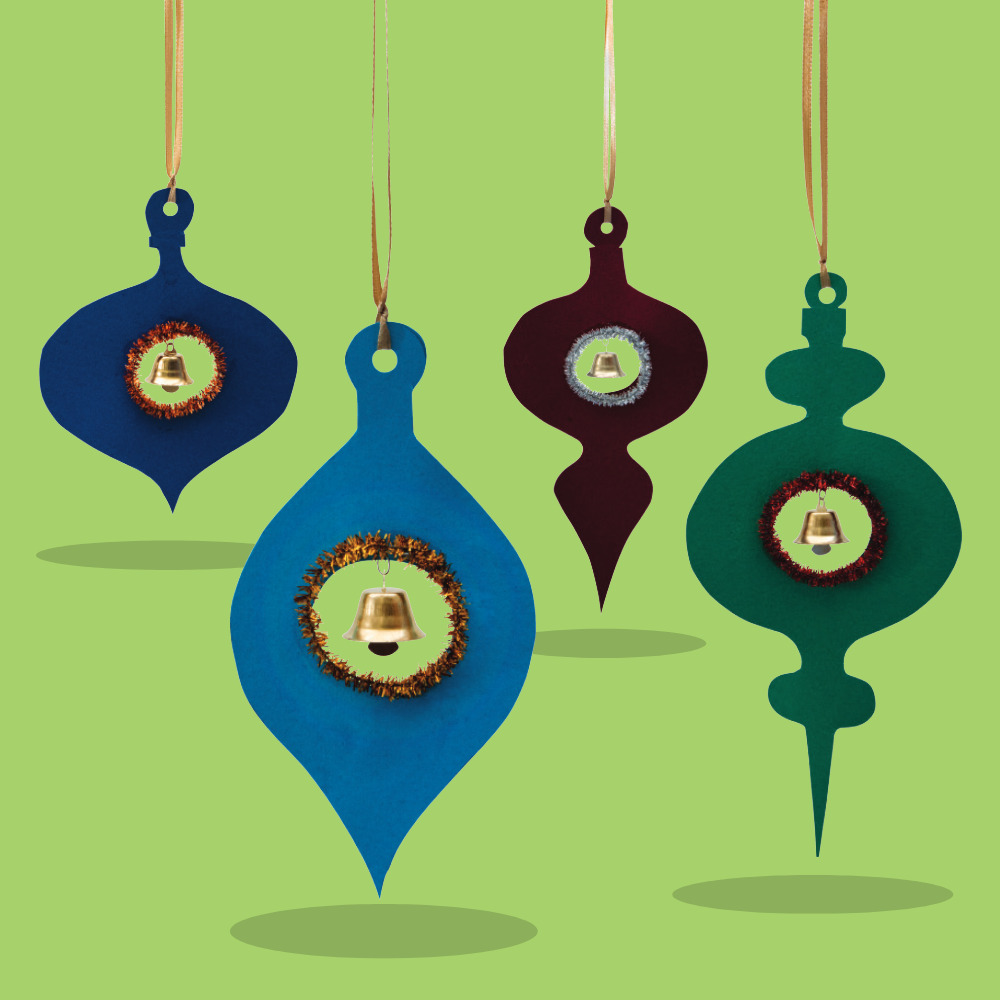
These paper crafting favourites will look beautiful hanging around the classroom or on the Christmas tree at home. They can be made in so many different shapes and colours too! Christmas is all about jingle bells and these are a perfect way to bring your own personalised jingle bells to life!


You will need:

A4 Coastal Cardboard https://www.teaching.com.au/product/aus502#

Tinsel Pipe Cleaners https://www.teaching.com.au/product/cl2205

Christmas Ribbon Rolls https://www.teaching.com.au/product/cs9207

Gold Christmas Bells https://www.teaching.com.au/product/CS9208

Paper Punch One Hole https://www.teaching.com.au/product/acc003

Silver Craft Wire https://www.teaching.com.au/product/THE218

Supertac Glue https://www.teaching.com.au/product/th005


Let’s make it!

Draw your Christmas decoration shapes onto cardboard and cut out (make sure to leave room for the tinsel and bell in the middle, and a hanging hole at the very top).

Use a compass or small round object to draw a circle in the middle of the decoration (roughly 3.5cm diameter).

Cut out the centre hole (fold the cardboard slightly, make a snip and then use the snip to insert your scissors to cut around the circle line). Discard the trimmings.

Cut a short length of beading wire roughly 4cm long, thread a Christmas bell onto the wire, fold the wire in half and push one end through the cardboard decoration, roughly 1cm above the cut-out circle. Twist the two ends around each other to hold the bell securely (trim if needed).

Cut a sparkly pipe cleaner to approx. 15cm in length and bend around to form a circle to fit around the cardboard decoration centre cut out. Twist the ends around the circle neatly. Use strong glue to attach the sparkly pipe cleaner to the cardboard decoration and set aside to dry thoroughly.

When dry, use a hole punch to make a hole at the top of the decoration and tie a length of Christmas ribbon, forming a loop to hang.

Done! The perfect Paper Jingle Ornament is ready.


TIP: It doesn’t need to stop there! Add as much decoration and sparkle as you like with drawings, embellishments and glitter.


So, there you have 9 beautiful Christmas craft activities to give you decorative goodies that young and old alike will love. Hang them, place them, gift them, share them, enjoy them!

If you’d like to download the step-by-step activity pack pdf, click here.

Happy crafting and seasonal wishes and please share your crafty seasonal awesomeness with us @modernteaching


Shop MTA>

Blog home>


Posted on

13 Crafting Ideas For The Festive Season

Christmas Blog leaderboard

The most magical time of the year is fast approaching, which makes now a perfect time to organise your upcoming holiday season arts & crafts.

In this blog, we’ll showcase wonderfully inspiring crafting ideas to get you started. Whether you’re looking for classroom decoration activities or Christmastime keepsakes with memories to treasure for countless years to come, you’ll find all the projects you need for children of all ages including step-by-step guides to take the hassle out of planning.

So, sit back & relax and choose your favourite bright & merry handicrafts to release children’s festive creativity.


Santa’s Cookies Porcelain Plate


Santa's Plate


Father Christmas must get hungry with all that work he does! Santa’s very own cookie plate will surely go down a treat! White porcelain plates make a wonderful blank canvas for children to decorate with drawings and words, using glass & porcelain markers or paint. Whether it’s “Cookies for Santa”, “Carrots for Rudolf” or a personalised plate for the Christmas lunch table, children are sure to enjoy making their own tableware to be treasured for years to come.

To set the markers and paint for wear & tear and dishwasher use, the plate will need to be baked in an oven. Simply set oven to 150 degrees C, and once the oven temperature has been reached, bake the plate for 30 minutes. Turn the oven off and allow to cool before removing. Santa’s plate is now ready for his favourite snacks.

*TOP TIP – Paint provides great overall coverage of colour, while porcelain markers provide precise detail.

Featured Products;

Porcelain Plates

Glass & Porcelain Markers

Glass & Ceramic Paint


Ceramic Hanging Ornaments


ermaic Hanging Ornaments


Fun & festive ceramic hanging baubles, also in Santa shapes, Christmas trees and candy canes and stockings make beautiful gifts and keepsakes.

Decorate your ceramic surfaces with porcelain markers, ceramic paint or poster paint and finish off with glitter glue or Christmas-themed glitter for extra sparkle and pizzazz.

Perfect for hanging around the classroom, on the Christmas tree at home or to gift as thoughtful presents that will no doubt take pride of place!

Featured Products;

Ceramic Hanging Bauble

Glass & Porcelain Markers

Glass & Ceramic Paint

Metallic Silver Porcelain & Glass Painter

Metallic Gold Porcelain & Glass Painter


Air Dry Clay Ornaments


Air Dry Clay Ornaments


Air dry clay, cookie cutters, wooden stampers and glitter glue – yes please! So many crafting favourites feature in this action-packed handicraft experience. The end results make very special ornaments that will surely adorn the family Christmas tree for countless years into the future. Metallic yarn in red, green, gold, silver or blue makes the perfect hanging cord to match the sparkly austere texture of the glittery clay to hang proudly.


STEP BY STEP

  1. Using the wooden rolling pin, roll out a handful of air-dry clay until it is smooth and flat (roughly 1cm thick to ensure your decorations are sturdy).
  2. Press a cookie cutter shape into the dough and press firmly until it cuts through the clay.
  3. Gently remove the excess clay (this clay can be used again or used to make extra embellishments including clay beads).
  4. Next, press one of the block print stamps into the clay and lift, creating an indented pattern.
  5. Using a skewer or the pointed end of a pencil, gently poke a hole in the top of your shape (ensuring your hole is large enough to thread your chosen cord or twine).
  6. Lift your decoration and gently smooth down the edges with your fingers.
  7. Set aside for 24 to 48 hours to dry.
  8. When the clay ornament is completely dry (firm to the touch) add a thick layer of glitter glue to the surface, letting the glue flow and sit in the indented pattern.
  9. Set aside to dry for 24 hours.
  10. When your ornament is completely dry, thread your desired length of cord or twine through the decoration, and tie in place with a knot.
  11. Lastly, tie off the very ends of the cord/twine with a firm knot to ensure your decoration is ready to hang safely.


*TOP TIP – Adding several layers of glitter glue (and setting aside to dry between layers) will add extra shine and lustre to your decorations.


Featured Products;

White Creatistics Air Dry Ceramic Clay

Christmas Cutters Set

Christmas Block Print Stamps

Christmas Glitter Glue


Pinecone Australian Animal Ornaments


Pine Cone Aussue Animal Ornaments


These adorable Australian animal pinecone ornaments pay tribute to the natural environment around us, incorporating flora & fauna-themed natural resources and textiles.

To make these cute critters, simply use strong tacky glue or a glue gun to stick the pre-cut pieces onto the pinecones provided and attach the length of twine at the top to hang on the Christmas tree. Included in the pack are 5 koalas that hold a piece of holly and 5 kangaroos that hold a candy cane – perfect for a festive-themed activity for the holiday season.

*TOP TIP – Pairing this crafting activity with Australian Animal story books or pretend play will enrich children’s exploration of literacy and language.


Featured Products;

Pinecone Australian Animal Ornaments

Mini Glue Gun – Low Temperature

Tacky Glue


Paper Straw Decorations


Paper Straw Decorations


Over recent years the nation has been ditching plastic straws to better care for our environment – replacing those harmful plastics with eco-friendly paper alternatives, which is fantastic news both for the environment and for us teachers so we don’t need to ditch our favourite straw crafts!

These sweet Christmas trees are super simple to make, gluing ascending lengths of paper straws onto wooden paddle pop sticks and adding a length of twine to hang. Glitter pom poms or sparkly stars will make the perfect finishing touch to your project.

*TOP TIP – It’s not just Christmas trees that can be made – why not try candy canes, stars and bell shapes, or swap the pop sticks for pipe cleaners for round threaded wreath ornaments.


Featured Products;

Assorted Paper Straws

Green and White Bakers Twine

Red and White Bakers Twine

Glitter Pom Poms

Adhesive Christmas Stars

Paddle Pop Sticks

Creatistics Strong Craft Glue


Gingerbread House


Gingerbread House


No holiday season is complete without a Gingerbread House! Whimsical and looking oh-so-delicious, these quaint wooden houses make beautiful seasonal displays or props to inspire imaginative play. Made from plain MDF, they’re calling out to be decorated with paint, patterned paper and Christmas embellishments & finished off with Christmas Bio Glitter & Stars.


*TOP TIP – Decorating Gingerbread houses over multiple days will allow glue to dry in between the paper and embellishment layers for a more workable crafting surface.

Featured Products;

Gingerbread House

Christmas Candy Colour Chenille Sticks

Building Pattern Paper

Mini Christmas Trees

Green Pom Poms 

Red Pom Poms

Christmas Assorted Buttons

Cotton Wool Balls


Native flora-inspired Christmas Wreath


Native Flora Inspired Wreath


Traditionally, the Christmas wreath’s evergreen foliage represents growth, and the circular shape having no beginning and no end signifies eternal life. For such a long time they have been hung on the door to welcome the Christmas spirit in to bring good luck to all.  These stunning wreaths may just bring you some good luck during the holiday too!

Made from a wooden base to provide a stable surface in which to glue or weave any number of arts & crafts resources, these beautiful wreaths make the perfect adornment for any front door.

The steps below are terrifically age-appropriate for older students. Younger students or preschool-aged children will likely enjoy painting their wreaths with wood-appropriate paint and using PVA washable glue to stick down Christmas collage items.


STEP BY STEP

  1. Apply strong glue over one surface of the wooden wreath and press a sheet of hessian onto the glue, set aside to dry.
  2. When the glue has dried, cut away excess Hessian.
  3. To make the leaves, fold a green piece of paper in half, and then half again (snipping with multiple layers of paper makes for light work). Two pieces of green A4 paper have made all the foliage for one wreath.
  4. Using a pencil, draw leaves or sprigs of leaves onto the paper and carefully cut around. Using a few shades of green will add depth and drama to your wreath.
  5. Arrange your leaves around the wreath and glue into place.
  6. To make the flowers, cut strips of red paper lengthways (1 piece of A4 paper will make 8 flowers).
  7. Using scissors, make fringing by carefully snipping down the length of the paper leaving ½ cm on one edge (snip gently to avoid cutting through the strip).
  8. Next, roll the fringe into a tight coil, adding a little bit of glue to hold in place. Pinch together to hold for a few moments (you can also use a peg to hold them in place until they dry completely). When thoroughly dry you can make the flowers look realistic by gently scrunching the petals to fan them out.
  9. Use strong glue to adhere the flowers onto the wreath.
  10. Glue any additional embellishments onto the wreath as desired.
  11. Attach a length of jute string to the top of the wreath and it’s ready to hang!


*TOP TIP – A layer of Hessian over the wooden wreath continues the natural feel and creates the perfect surface to weave or thread wire ornaments through.

Featured Products;

Wreath with Bow

Christmas Bows

Wreath Decorations

Nature Cover Paper

A4 Christmas Cover Paper

Jute Hemp Twine

Hessian Sheets Natural

Tacky Glue


Shrink Film Ornaments


Shrink Film Ornaments


Shrink Film makes for incredibly fun art experiments! A teacher’s dream, the Christmas Shrink Film Ornament Pack includes all you need to make a whopping 96 bauble ornaments, with coloured pencils and hanging thread included. Simply use coloured pencils to design your bauble shapes and then bake in the oven to reduce the size by roughly 60%, turning your decoration into thick hard plastic.

The pre-cut Christmas ornaments are wonderfully convenient, however, if you’re after free form to design then the clear shrink film or printable shrink film options are terrifically open-ended.


Baking Instructions:

  1. Colour in your design on the matt side of the shrink film using coloured pencils or permanent markers.
  2. Preheat oven to 150°C.
  3. Place design on a lined tray (matt side up) and bake in preheated oven.
  4. Plastic will begin to shrink after 10 seconds. Remove from oven when plastic has returned to its flat shape.
  5. If your pieces don’t lie completely flat, lightly press with a spatula, cardboard or oven mitt.
  6. Wait for the shrink film to dry completely before handling.


*TOP TIP – With shrink film, coloured pencils go a long way. A very light shading only will result in bold and vibrant colours.

Featured Products;

Christmas Shrink Film Ornament Pack

Shrink Film Activity Pack

Mini Jingle Bells


Woven Christmas Tree Cards


Woven Christmas Tree Cards


These festive Christmas tree cards incorporate paper crafts & threading together to make oh-so-special greeting cards for spreading the holiday cheer. The metallic and glitter elements add a magical touch to bring children’s creations to life.

To adapt this activity for younger early childhood age groups, simply omit the threading elements, with children enjoying pre-cut lengths of yarn to glue down into a tree design, using washable PVA glue, age-appropriate embellishments and liquid crayon markers to decorate the inside.


STEP BY STEP

  1. Mark the threading holes with a pencil, and then poke a tapestry needle or skewer through the pencil marking all the way through the cardboard.
  2. Cut a length of yarn, thread your needle, and then weave the yarn up and down, threading in and out of the holes until you’ve created a Christmas tree design.
  3. On the front of the tree use a length of metallic gold yarn to weave in and out of the tree, creating a Christmas Tree tinsel design, and tie off on the front reverse.
  4. On the front reverse of the card, secure your yarn with strong tape and create a flat surface).
  5. Glue half a piece of coloured cover paper onto the inside of the card to cover the back of the tree and press down to flatten (glue sticks are ideal for this task, so the paper won’t crinkle).
  6. The front of your card is now ready for embellishments – pom poms, a Christmas star and glitter glue.
  7. Set aside to dry completely for 24 hours.
  8. Your card is now ready for drawings or writing on the inside – paint pens are ideal for vibrant creations over coloured paper.


*TOP TIP – Writing or drawing on the coloured cover paper before sticking it inside the card will make a more workable surface for younger students.

Featured Products;

White Cards and Envelopes

Green Acrylic Yarn 

Gold Metallic Yarn

Glitter Pom Poms

Adhesive Christmas Stars

Tapestry Chenille Needles

Christmas Glitter Glue

A4  Christmas Cover Paper

Creatistics Superstik Glue Stick

Tacky Glue


Wooden Crafts


Wooden Crafts


Pre-cut Wood Crafts are the perfect combination of woodworking, imagination and art – essentially blank canvases in which children can tinker with paint, glue and collage materials to design & personalise works that are truly their own.

You’ll find an incredibly large offering of wood crafts at MTA, so much to choose from that’ll make teachers giddy with excitement, including convenient ornament or tree packs that include all the glue, paint and embellishments you need to complete the activity.


*TOP TIPMessy mats or table coverings make brilliant surfaces to protect tables from wet and messy play art activities.


Featured Products;

Wreath with Bow

Hanging Christmas Tree

Wooden Snowflake Decorations

Wooden Christmas Ornaments

Christmas Collage Pack

Metallic Christmas Collage Pack

Handmade Christmas Paper

Fabric Paint Set


Woven Wire Ornaments


Woven Wire Ornaments


Beautifully simple wire ornaments make a welcoming invitation for children’s personalisation. Use wire, yarn or string to weave around, filling the open space with Christmas colours and finishing off with metallic yarn & beads – and a sparkly pom pom star for the tree.  Your woven ornaments are ready to hang on the tree year after year or share as gifts for loved ones.

Yarn can be wrapped around the wire ornaments in free form using your hands only (ideal for early childhood) or incorporate sewing elements into the activity using tapestry chenille needles for older students or plastic lacing needles for younger students. Tying off your yarn after every few wraps will ensure the younger years don’t unravel their creations when they need to take a break.

Tying off your yarn after every few wraps will ensure the younger years don’t unravel their creations when they need to take a break.


STEP BY STEP

  1. Cut a long piece of your desired coloured yarn and tie it around the metal shape (tying the yarn onto the wire shape will ensure you have a firm grip to get you started).
  2. Gently weave the yarn around the shape, wrapping over and under, in and out and all around, pulling firmly to ensure the yarn stays in place.
  3. When your decoration is starting to look colourful and almost finished, it’s time to start adding beads.
  4. Thread or slip a bead over the yarn, adjusting it into place as you continue to wrap the yarn.
  5. Add as many beads for your desired look, and finish tie the yarn firmly to the decoration to keep it all in place.
  6. Lastly, add a length of twine to the top of the decoration, making sure to tie it at the end to create a loop for hanging.


*TOP TIP – The thick acrylic woollen yarn is easier to handle and wrap to create form and colour, with the more delicate metallic yarn bringing a sparkly touch to finish off.

Featured Products;

Wire Ornaments

Metallic Gold Yarn

Green Acrylic Yarn

Red Acrylic Yarn

Christmas Pony Bead

Glitter Pom Poms


Festive Terracotta Garden Pots


Festive Terracotta Garden Pots


Personalised pots with seedlings are the perfect growing gift to keep the festive season thriving long after the Christmas Tree has been packed away. Endless decorating options await with the terracotta surface lending itself to porcelain or paint markers, paints and embellishments. Sparkle paint metallic markers and glitter glue add a magical touch for Christmas-inspired decorating.

The terracotta pots are available on their own, or as a Garden Grow Kit complete with wooden plant stakes and herb seeds to make sure the finishing garnish is ready for your Christmas feast!

TOP TIP – Use a spray varnish to ensure your pot is ready for outdoor use with a permanent barrier to dirt, tarnish, wear & tear and moisture.


Featured Products;

Garden Grow Craft Kit

Fine POSCA Markers

Bullet  POSCA Markers

Christmas Ribbon Rolls

Natural Hessian Sheets


Iron-On Bead Ornaments


Iron on Bead Ornaments


Have you tried making Iron on Bead ornaments? Simply arrange the Christmas-coloured beads on the peg boards to make your desired pattern. You’re then ready to fuse the beads together using a hot iron to make a long-lasting ornament to adorn classrooms, homes or the beloved family Christmas tree.

But it’s not just ornaments that can be made! Iron-on Beads are incredibly versatile – either fused together or used as traditional beads for loose parts threading. Ideal for jewellery including bracelets, necklaces and earrings. Glue them onto wood and paper crafts for textural collage embellishments. Make festive hot drink coasters, gift tag decorations, hanging key chains or bag decorations and even plates for treasured trinkets! My only advice for this activity would be to buy several tubs – because they’re wonderfully addictive!


STEP BY STEP

  1. Arrange the beads into a design on the boards.
  2. Warm a household iron to high making sure the steam is off.
  3. Cover the design with a sheet of ironing paper.
  4. Iron over until the beads start to melt and fuse together into a colourful and flexible shape.
  5. Allow your design to cool before removing from the bead board.
  6. Cut a length of twine and tie onto the top of your ornament ready to hang.


TOP TIP – Iron-on Beads are small loose parts, perfect for school-aged students. Preschool age groups (aged 3+ years) may find the Jumbo-sized Iron on Beads and boards a more comfortable working size.


Featured Products;

Christmas Iron on Beads Kit

Creatistics Iron-on Beads Pack

Red and White Bakers Twine 

 Red Metallic Yarn


*All these Christmas crafting activities can be modified or adapted to suit different age groups, taking away small parts for children under 3 years of age and replacing them with larger safe parts. Where scissors, glue guns or irons are used, educators may use adequate supervision to suit the needs of the children (pre-cut shapes for young children, PVA glue in place of glue guns etc.) or educators may safely carry out risky steps themselves (such as the iron for iron on beads).


What are your favourite seasonal crafts for the holiday season?


Download: Christmas activities PDF Bundle

Blog Home>

Shop MTA>


Posted on

Crafts To Inspire Christmas Creativity

Christmas Craft Resources flatlay

Christmas is such a special time of year, and no doubt in recent times it has become an even more important holiday where families can bond and celebrate. Inspiring joy and inviting groups of students to create festive crafts brings about warmth and connection. The act of making can have such a positive effect on our mental health, so inviting children and adults alike to break out the felt, paper and a pom pom or two will ignite the Christmas spirit as we roll into the festive season.


Personalised Christmas Bags

Christmas canvas bag decorated with Christmas baubles
Who doesn’t love a unique and fun reusable shopping bag nowadays, especially since the removal of single-use plastic. There are so many possibilities with a calico shopping bag, as previously seen with the block print stamps. Students will enjoy coming up with festive designs such as reindeers, baubles, Christmas trees and Santa on his sleigh, making this project an individual experience.

Christmas canvas bag decorated with Christmas tree

Once they have decided on their design, students can either cut felt shapes freehand or create paper patterns to pin to the fabric. Students will have fun arranging their felt pieces onto the calico bag before gluing them down. Giving students the option of adding embellishments like buttons, ribbons, pom poms and sequins to their textile arrangement adds a lovely three-dimensional texture to their final composition. Certainly a must-have to stand out from the crowd when Christmas shopping.


Featured Products:

Calico Shopping Bag – Pack of 10
Christmas Felt- Pack of 50


Simple Mosaicking

Christmas Tree and baubles
When thinking about the art of mosaicking, I know sometimes the process can be quite daunting. Especially the idea of using tile adhesive and grout with students. However, these resin mosaic tiles are fantastic as they can be used on all types of surfaces, can be cut with scissors if necessary and can be adhered with craft glue or pushed into mediums like Magiclay. Students can adorn papier-mache shapes such as baubles or cones since the process is not too complex. They can explore patterns when making Christmas coasters and photo frames, and for young children it will develop their fine motor skills as they pick up each little mosaic square. These mosaic tiles shimmer so brightly in the light that they are sure to spark the imagination of all who encounter them.


Featured Products:

Mosaic Tiles Christmas Colours
Square Wooden Coasters- Pack of 20

Paper Mache Cones – Pack of 6
Christmas Paper Mache Balls with Gold String

Christmas Pom Poms – Pack of 300


Fun and Easy Shrink Film

Shrink Film Christmas craft ornaments
This Christmas project certainly brings back a fond memory from my childhood where I made shrinky dinks out of chip packets. The process has certainly come a long way since then with much sophistication. Your students will be absolutely fascinated with this process and will be glued to the oven door as they watch their decorations bend and contort before laying flat.
These Christmas Shrink Film Decorations have lovely patterns and designs where students can use permanent markers or pencils to add colour. I personally like pencils as they enable students to explore ombres and blending, which looks striking when shrunk to a miniature size. Paired with leather thronging for a necklace or placed on a metal key ring, they become a brilliant present or keepsake.


Featured Product:

Christmas Shrink Film Decorations- Pack of 12


Christmas Stamping

Christmas wooden block stamps
Who doesn’t love a stamp, especially when it is adorned with an iconic Christmas object! Stamps are so versatile for this time of year and can be applied to a wide variety of materials. Pair them with acrylic paint, block ink, embossing fluid or ink pads, the medium and colours that can be used are endless and expose students to the concept of repetition. Whether stamping on fabric or paper, the final print can be used to create many different Christmas-inspired delights.

Christmas Craft Cards and pom poms on grass background

These include Christmas cards where prints can be layered on top of paper, fabrics and hessian. Santa portraits can be drawn inside wreath prints and stamps can be repeated over the surface of a card. A lovely way to add colour to your prints is with watercolours or pencils; this not only enhances the print but also allows students to explore different colour combinations. This type of project is always a favourite as people of all ages enjoy giving cards to their loved ones.

Christmas craft brooches on grass background

If Christmas cards are not your thing, stamps can also be pushed into clay to leave an impression on its surface. Whether you use air-dried clay or earthenware, these lovely pieces can be turned into pendants and brooches by adding holes or pin backs. Once dried or fired, you can have so much fun adding colour to these stamp designs and, when complete, a spot of gloss really brings them to life. Students will really treasure these as well as delight in giving them to special people in their lives.

Christmas canvas reindeer block print bag


If fabric is more your cup of tea, then these stamps are just delightful. Using fabric paint and a roller, they can be used to create repetitive designs onto T-shirts and calico shopping bags. Students will love coming up with their own compositions with the different stamps and can play with pattern when choosing colours.


Featured Products:

Christmas Block Print Stamps- Set of 6

Christmas Pom Poms – Pack of 300

Creatistics Air Dry Ceramic Clay

Calico Shopping bag- Pack of 10


Bling up Your Favourite Artwork

Christmas Glitter Frames on
A framed artwork from a young artist would have to be the most special Christmas gift a child can give you. Whether it is a pencil drawing, a watercolour painting or a printout of a digital piece, these glitter photo frames are just fabulous. Imagine combining your students’ artwork with a snow globe. Students will love placing their work on one side and then filling the other side up with water to give their masterpiece a touch of sparkle. Students can make artwork specifically to the size of these frames or artwork can be photographed and resized digitally before being printed out. Who doesn’t love a little glitter in their life?


Featured Products:

Glitter Liquid Photo Frame – Pack of 10

Christmas Pom Poms – Pack of 300


Cute as a Button Reindeers

Christmas craft ornaments sitting on Christmas paper
Can you name all the reindeer that pull Santa’s sleigh? These reindeer ornaments are just the cutest and I know your students will think so too. Their most obvious use is to create a reindeer face, whether it be with markers, pencils or watercolours, and it is then placed inside and covered with the glass cabochon. Another alternative to creating the reindeer would be to place a pattern piece of paper under the cabochon and then add eyes and a nose to the surface of the glass with craft materials. Either way, these reindeers can then become pendants or ornaments where they can be further personalised when adding colours and embellishments to the wooden backing.
There will always be that student who will think outside the box and do something a little bit different. Who said it had to be a reindeer? I certainly agree. You can also fill these pendants with small paintings of Christmas icons and adorn your backing to match. The creativity is endless.


Featured Product:

Wooden Reindeer Ornaments- Pack of 10


Versatile Paper

Tissue paper Christmas bauble with festive background
Ah, don’t you just love the smell of paper during the festive season! It is the aroma of a million ideas and possibilities for an abundance of folded, cut and collaged crafts. Whether it be patterned paper or tissue paper, they are equally fun and useful, so it is fantastic when they come in a single handy pack. From origami folded stars to Christmas cards and decoupage Christmas baubles, what is your favourite way to use paper during the festive season?

Christmas Tree and pom poms on grass background
I particularly love to show students how to fold and roll paper into different shapes that can then be used on three-dimensional forms. A cone is the perfect beginning of a Christmas tree where paper can be applied in different ways to create interesting forms. Paper can be fringed or rolled into little cones and layered all the way up to form the tree. I always tell my students that paper is so versatile and that with a little snip and a twist it can become something amazing!


Featured Products:

Christmas Paper & Tissue Pack of 300

Christmas Papier Mache Balls Pack of 10
Paper Mache Cones – Pack of 6


This year, I hope Christmas brings an extra bit of magic and joy to us all. I hope that Christmas projects and crafts can be enjoyed and used to highlight how special the festive season is to families, friends and communities. I hope that the act of creating and giving can bring us together to regain that feeling of pure happiness that we experience when exploring and expressing ourselves creatively.


About the Author
Olivia is a specialist Visual Art Teacher in an ELC, primary and secondary school setting. She has a broad breadth of experience with inquiry learning and is an IBO qualified educator. Olivia particularly enjoys developing Visual Art units around STEAM which include electronics, technology, and science concepts. Follow Olivia on Instagram in her quest to inspire creativity @creativemindsinbloom.


Shop MTA>

Blog Home>

Posted on

Spark The Christmas Imagination

Christmas Craft images hanging on string with pegs with Christmas themed background

Christmas is such a delightful time of the year. The anticipation of this joyous occasion brings such an amazing atmosphere to the art room as the impending holidays approach. Students of all ages embrace the opportunity to create festive-themed pieces that are treasured on trees and shelves in their family homes. With such a wide array of art and craft that can be produced, the hardest part is choosing what to create!

Christmas Wreath

Christmas wreath yarn craft project.

We hang them with such love and care on our doors during the Christmas period as a symbol of family and eternity, it is only fitting that they should feature in any festive crafting project.
This wreath kit is just perfect as you can make it as is or you can add your own unique touches to it. The creating process will build and develop fine motor skills as each strand of yarn is attached to the cardboard ring. Students can personalise their wreaths with different coloured yarn, extra pompoms, bows, buttons, bells or even felt cut-outs. I have used the centre cardboard circle and some yarn to make a bow. This would be a lovely addition to any Christmas tree.

Featured Products:
Wreath Yarn Kit
Red Acrylic Yarn  
White Acrylic Yarn


Paper Angel

Christmas Angel Craft Project.

What a classic, the Christmas angel has been re-imagined in so many ways in classrooms and art rooms alike. Their angelic form and principal position on any tree make them a delight to create.
This version can be produced simplistically or can have all the bells and whistles added to it to make it sparkle bright. The basis for the angel is paper which can be white cartridge paper or tissue paper that is then concertina folded. When using cartridge paper students can use gold and silver pens to add patterns before folding. The heart-shaped doilies are divine for this project, just the ideal shape to fashion wings and an elaborate collar for the angel’s dress before adding a Magiclay head adorned in glitter. A halo can be made from various materials such as armature wire or a tinsel pipe cleaner and is the perfect finishing touch for an angel that will capture many hearts.


Featured Products:
Coloured Tissue Paper
Gold Heart Shaped Doileys
Candy Coloured Paper Magiclay 
Creatistics Glitter Shakers


Christmas Printmaking

Print Making piece of art on canvas

There are so many different symbols that we associate with Christmas time. Printmaking is a wonderful process to use to give your students’ illustrations a new life. Using the A4 printing foam, a Christmas-inspired drawing and a blunt pencil or ballpoint pen students can transfer their design onto the printing plate which can be cut to any size or shape. The creative process from here is limitless where different backgrounds can be created to apply the print such as tissue paper collages, watercolour washes and textured papers.

Featured Products:
A4 Printing Foam 
Coloured Tissue Paper
Printing Ink


Australiana Christmas

Christmas Kanagaroo Craft Project inside a Cloch.

From Santas on surfboards to kangaroos pulling a ute sleigh, an Australiana Christmas is unique and wonderful and is the inspiration for this artwork using a glass cloche. This activity has a lovely depth to it as it combines sculpture and drawing. Students can imagine Australian Christmas scenes, drawing the background on paper to curve around the glass cloche, and then add to their scene with Magiclay models. A task that will have their imaginations running wild with a hint of humour. This piece will be treasured by all and is one that all children will place on the shelf every year during the festive period.

Featured Products:
Candy Coloured Paper Magiclay 
Glass Cloche


Gingerbread People

Gingerbread an Christmas Craft Project .

A character that has inspired songs and been in movies, the beloved gingerbread man has personality and style.
The Felt Gingerbread Sewing Kit comes complete to assemble your very own plush gingerbread person. Fantastic for beginner sewing skills with the pre-cut holes, the plastic needle supplied glides through to make each stitch. Once the student’s gingerbread person is filled with stuffing then the creativity can begin. Use the accessories supplied with the kit to bring them to life or give students the option of other craft materials such as buttons, fabric, glitter and felt shapes and pieces to add their own unique touches.

Featured Product:
Felt Gingerbread Sewing Kit


Paper Bag Elf

Christmas Craft Paper Bag Elf Activity

It would not be Christmas without Santa’s fabulous little helpers, the elves, busily working away in the toy shop. Inspired by “The Elf on the Shelf” this paper bag sculpture will enhance any students paper techniques. From concertina folds to jack-in-the-box springs, this elf has it all. Two Christmassy-coloured paper bags form the base shapes that are packed with low gsm paper, closed and glued together to form the head and body. Now it is time to add character using patterned paper. This step is where each student can make their own creative choices to decide what their elf will look like. From bows to buttons and hats, each student can give their elf a unique style.

Featured Products:
Christmas Coloured Paper Bags
Handmade Christmas Paper


Christmas Cards

Christmas Craft Card Activy displayed on top of brown box

Christmas wishes and joy are spread across the globe in folded pieces of card and paper. Students love giving these to their families as well as their friends. There are so many different materials you can use to create, and these natural coloured cards are the perfect canvas for creative ideas to adorn their surfaces. Buttons are so versatile, and students can imagine them into anything.


Featured Products:
Natural Cards and Envelopes
Christmas Coloured Buttons
Christmas Sequins Mix 

How do you spark the Christmas imagination in your learning environment? We’d love to hear from you!


About the Author
Olivia is a specialist Visual Art Teacher in an ELC, primary and secondary school setting. She has a broad breadth of experience with inquiry learning and is an IBO-qualified educator. Olivia particularly enjoys developing Visual Art units around STEAM which include electronics, technology and science concepts.


Shop MTA>

Blog Home>